4th of July Rice Krispies Treats – Easy, Patriotic, No-Bake Recipe
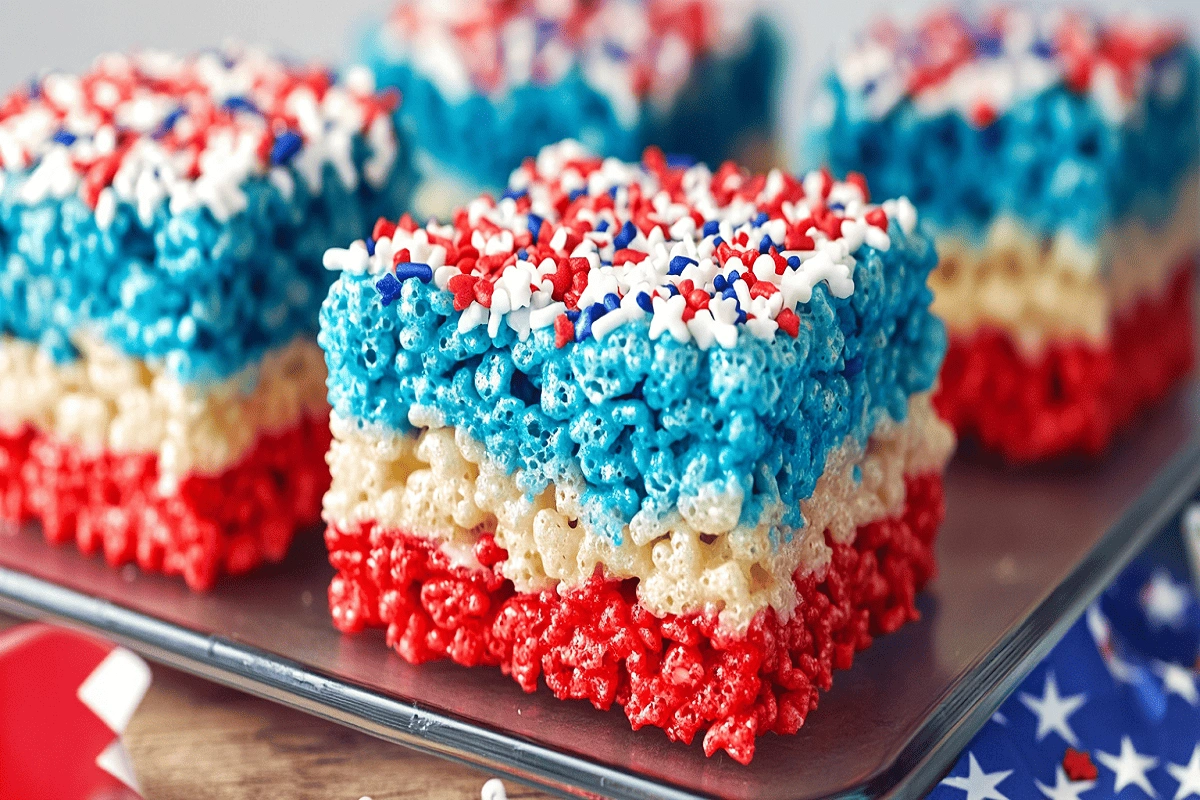
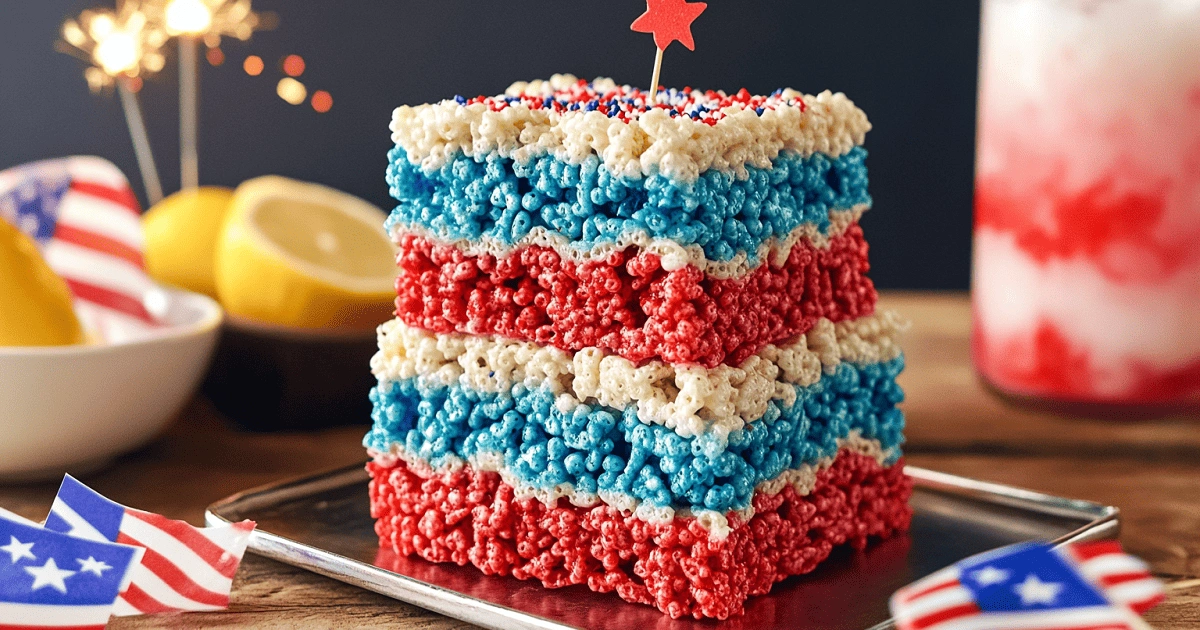
4th of July Rice Krispies Treats are the ultimate easy, colorful, and patriotic dessert to impress your guests this Independence Day. With gooey marshmallows and crispy cereal stacked in bold red, white, and blue layers, these no-bake treats are as festive as they are foolproof. Perfect for hot summer celebrations, they come together quickly without heating up your kitchen ideal for BBQs, picnics, and fireworks parties.
Whether you’re heading to a BBQ, watching fireworks, or hosting a party, these star-spangled treats bring flavor, fun, and a big visual impact to your holiday table.
Why 4th of July Rice Krispies Treats Are a Must for Your Celebration
Nostalgia Meets Patriotism: Why This Treat Works
Rice Krispies treats have been a staple in American kitchens for decades. They’re simple, sweet, and bring back childhood memories. When you dress them up in red, white, and blue, they instantly become the star of any Independence Day spread.
These treats evoke a sense of celebration without requiring hours in the kitchen. That balance of sentiment and simplicity is exactly what makes them so beloved.
The No-Bake Advantage for Summer Gatherings
July heat can make baking feel unbearable. That’s where this no-bake dessert saves the day. All it takes is a microwave and a spatula to have a full batch ready in just 20 minutes.
They’re perfect for:
| Event Type | Why They Work |
|---|---|
| Backyard BBQs | No melting, easy to transport |
| Pool Parties | Kids love them, minimal mess |
| Potlucks | Travel well, no refrigeration needed |
| Fireworks Viewing | Easy to eat with hands, crowd-friendly |
4th of July Rice Krispies Treats – The Best No-Bake Dessert Idea
- Total Time: 25 minutes
- Yield: 12–16 treats (depending on cut) 1x
- Diet: Vegetarian
Description
These easy no-bake 4th of July Rice Krispies Treats are layered with vibrant red, white, and blue marshmallow cereal bars. Festive, fun, and fast to make they’re the ultimate Independence Day party dessert.
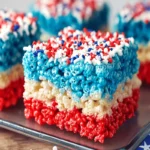
Ingredients
Ingredients
For the Layers
- 12 cups mini marshmallows (divided into 3 batches of 4 cups)
- 9 cups Rice Krispies cereal (divided into 3 batches of 3 cups)
- 9 tbsp unsalted butter (divided into 3 batches of 3 tbsp)
- Red food coloring
- Blue food coloring
- Patriotic sprinkles
- Nonstick cooking spray
Instructions
1️⃣ Prepare the Pan
Spray a 9×13-inch baking dish with nonstick spray and set aside.
2️⃣ Make the Red Layer
In a large microwave-safe bowl, melt 4 cups marshmallows with 3 tbsp butter for about 1 minute and 30 seconds. Stir until smooth. Add red food coloring and mix until evenly tinted. Stir in 3 cups cereal and mix well. Press mixture evenly into the bottom of the greased pan.
3️⃣ Make the White Layer
Repeat the same process with another 4 cups marshmallows and 3 tbsp butter—but do not add food coloring. Stir in 3 cups cereal and spread evenly over the red layer.
4️⃣ Make the Blue Layer
Repeat the process a third time, adding just 2 drops of blue food coloring at first—mix and adjust as needed. Stir in 3 cups cereal and press evenly over the white layer.
5️⃣ Add Sprinkles
Sprinkle the top with patriotic sprinkles while the treats are still slightly sticky. Gently press them in so they adhere.
6️⃣ Set & Slice
Cover the pan and let sit at room temperature for about 4 hours, or until fully set. Slice into squares and serve!
Notes
-
Don’t over-mix the cereal; this keeps the texture soft and gooey.
-
Gel coloring is best for rich red and blue layers without making the mix watery.
-
For star shapes, use a metal cutter and grease it well to avoid sticking.
-
Store at room temperature in an airtight container for up to 3 days.
-
Freeze wrapped individual pieces for up to 1 month. Thaw at room temperature.
- Prep Time: 20 minutes
- Cook Time: 5 minutes
- Category: Dessert
- Method: No-Bake
- Cuisine: American
Nutrition
- Serving Size: 1 square (approx. 2x2 inches)
- Calories: 165
- Sugar: 14g
- Sodium: 110mg
- Fat: 5g
- Saturated Fat: 3g
- Unsaturated Fat: 1.5g
- Trans Fat: 0g
- Carbohydrates: 29g
- Fiber: 0g
- Protein: 1g
- Cholesterol: 10mg
Keywords: 4th of July desserts, patriotic Rice Krispies treats, red white and blue snacks, no-bake summer desserts, Independence Day recipes, layered Rice Krispies bars, easy party treats, kid-friendly 4th of July food, festive marshmallow bars, star-shaped desserts
Essential Ingredients & Tools for 4th of July Rice Krispies Treats
Ingredient List and Why Each One Matters
The beauty of 4th of July Rice Krispies Treats lies in their simplicity. Each ingredient plays a role in delivering the gooey texture, vibrant color, and perfect crunch that makes these treats so addictive. Let’s break it down:
| Ingredient | Amount | Why It Matters |
|---|---|---|
| Mini Marshmallows | 12 cups | The base of the treat—melted for a gooey, binding texture |
| Rice Krispies Cereal | 9 cups | Gives that signature snap and crunch |
| Unsalted Butter | 9 tablespoons | Balances the sweetness and adds richness |
| Red & Blue Food Coloring | As needed | Adds the bold patriotic colors—layered for a showstopping effect |
| Patriotic Sprinkles | Optional | Adds festive flair and crunch on top |
| Nonstick Cooking Spray | As needed | Helps press layers evenly and makes removal from the pan easy |
Ingredient Tips:
-
Use fresh marshmallows – stale ones don’t melt as smoothly.
-
Generic cereal works – but double-check for gluten-free if needed.
-
Gel food coloring – works best for bold, vibrant tones with less liquid.
Must-Have Kitchen Tools for Easy Prep
You don’t need a fancy kitchen setup to make these 4th of July Rice Krispies Treats, but a few basic tools can make all the difference.
| Tool | Use |
|---|---|
| 9×13-inch Baking Pan | Ideal size for layering and slicing uniform bars |
| 3 Mixing Bowls | Keeps each layer (red, white, blue) separate and manageable |
| Microwave-Safe Bowls | For melting butter and marshmallows efficiently |
| Large Spoon or Spatula | To stir and spread layers quickly before they cool |
| Measuring Cups | Ensures perfect ratios for consistency |
| Toothpicks | For checking coloring and swirling in designs if desired |
Pro Tip: Spray your spatula and hands with nonstick spray when pressing layers it prevents sticking and gives a smooth surface.
Don’t miss this No-Bake Dessert Tools Guide to upgrade your summer treat game.
Step-by-Step Guide to Making 4th of July Rice Krispies Treats
Preparing the Pan and Workspace
Before you start melting anything, get your tools and station ready. Act fast marshmallow mixtures set up quickly, so timing makes all the difference.
-
Coat a 9×13-inch pan well with nonstick spray to keep the treats from sticking.
-
Line your bowls – one for each color (red, white, and blue).
-
Have spatulas or spoons greased and ready for spreading each layer smoothly.
Staying organized lets you layer fast and evenly before the mixture firms up too soon.
How to Layer Red, White, and Blue Like a Pro
Here’s how to make each colored layer stand out and keep the classic chewy texture:
Step 1: Make the Red Layer
-
In a microwave-safe bowl, melt 3 tbsp butter and 4 cups mini marshmallows on high for 1.5 minutes.
-
Stir until fully smooth.
-
Add red food coloring (start with 3–4 drops) and stir to blend evenly.
-
Mix in 3 cups of Rice Krispies cereal and fold until coated.
-
Spread into the bottom of your greased pan. Use a greased spatula or wax paper to press evenly.
Step 2: Create the White Layer
-
Repeat the microwave step with 3 tbsp butter and 4 cups marshmallows.
-
Skip the food coloring.
-
Mix in 3 cups cereal, stir to combine, and press over the red layer.
-
Lightly press to avoid flattening the red base.
Step 3: Add the Blue Layer
-
Repeat the melting step once more.
-
Add 2 drops of blue food coloring gel works best. Stir until the color is uniform.
-
Fold in the final 3 cups of cereal.
-
Layer the blue mixture over the white and lightly press it into place.
Step 4: Decorate
-
While still slightly warm, add patriotic sprinkles and press lightly so they stick.
-
Optional: Add a swirl of melted white chocolate or edible glitter for extra sparkle.
Step 5: Let It Set
-
Let the pan sit at room temperature for 4 hours, uncovered.
-
Don’t refrigerate it’ll make the treats hard.
Once firm, use a sharp knife to cut into squares, rectangles, or fun shapes.
| Tips for Perfect Layers | Do This |
|---|---|
| Even thickness per layer | Use back of greased spoon or wax paper |
| Clean layer separation | Let each layer sit for a minute before the next |
| Sharp lines | Use a straight-edged spatula while pressing layers |

Check out our Layered Summer Desserts Tutorial for more colorful no-bake recipes.
How to Use Food Coloring Effectively in Rice Krispies Treats
Best Types of Food Coloring for Bold Layers
When crafting vibrant 4th of July Rice Krispies Treats, your food coloring choice can make or break the visual appeal. Here’s a breakdown of which types to use and why:
| Type of Food Coloring | Pros | Best For |
|---|---|---|
| Gel Food Coloring | Super vibrant, minimal liquid content, won’t water down the mixture | Deep red and blue shades |
| Liquid Food Coloring | Easy to use and widely available, but colors are lighter | Simpler pastel layers |
| Natural Food Coloring | Free from synthetic dyes, though less intense in color | Clean-label and allergen-free needs |
Pro Tip: Stir the food coloring into the warm marshmallow and butter mixture before adding the cereal this ensures vibrant, even color in every bite! This gives you even saturation and prevents streaks or clumps.
Want a deeper dive into color types? Chefmaster breaks it down brilliantly in their guide to different types of food coloring, especially when deciding between gel and liquid for bold baking projects.
Expert Tips to Avoid Color Bleeding
There’s nothing worse than nailing your layers only to find the red bleeds into the white. Use these expert tips to keep your red, white, and blue layers sharp and vibrant:
✅ Add Color Before the Cereal
✅ Let Layers Cool Slightly Before Stacking
Don’t rush. Allow each layer to cool for 1–2 minutes before adding the next. This helps create cleaner lines without color blending into each other.
✅ Use a Gentle Press
When spreading the top layer, use a gentle hand to avoid mixing colors or pulling up the layer beneath. Pressing too hard can push colors into the layer below.
✅ Stick to Bold Shades
Especially with red and blue, bold is better. Too little color can turn red into pink and blue into teal. Gel food coloring helps avoid that.
| Common Mistake | Fix It Like This |
|---|---|
| Red turns pink | Use more gel, and avoid overmixing |
| Layers run into each other | Wait 1–2 mins between stacking layers |
| Marshmallow mix too sticky | Grease your spatula and hands before pressing |
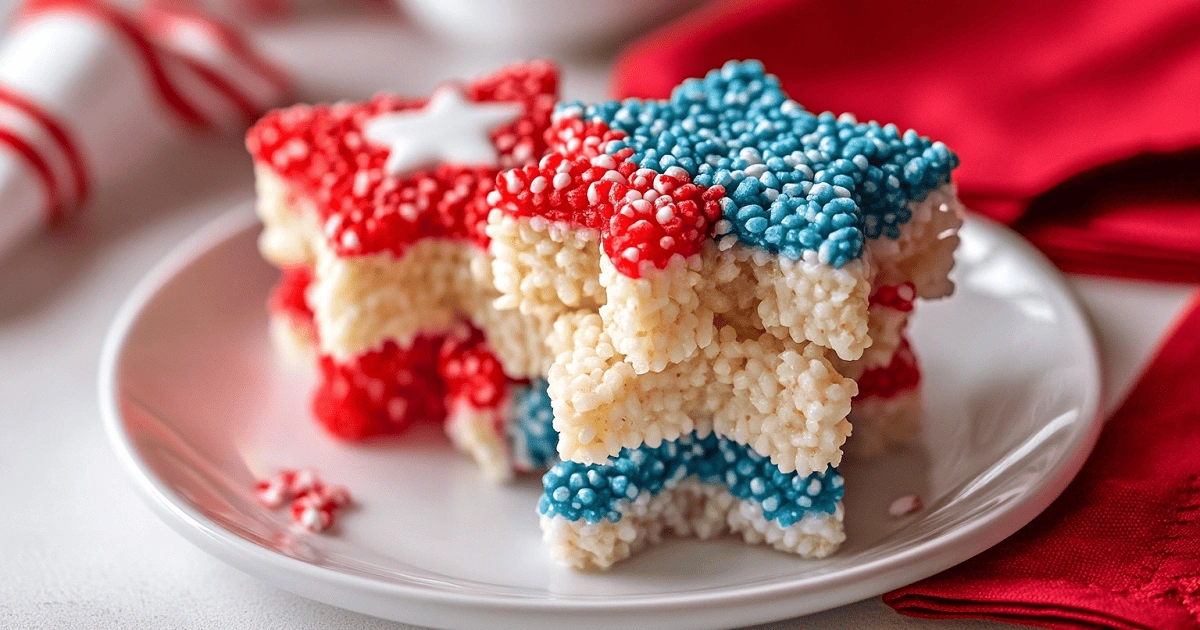
Creative Shapes – Stars, Flags, and More
Can I Make Star-Shaped Rice Krispies Treats?
Absolutely! After the layers have fully cooled and firmed up, press a star-shaped cookie cutter through the treat to create fun, festive shapes. Spray the cutter with nonstick spray to avoid sticking.
Other Fun Shapes
Try flag designs using a square mold or even use small cups to make individual treat servings. Kids will love helping with these custom designs.
How to Store and Freeze 4th of July Rice Krispies Treats
Keeping Your 4th of July Rice Krispies Treats Fresh
To maintain the chewy texture and festive appearance of your 4th of July Rice Krispies Treats, store them in an airtight container at room temperature. They’ll stay fresh and soft for up to 3 days. Avoid refrigerating—cold temperatures can harden the marshmallows and dull the layers.
Can You Freeze 4th of July Rice Krispies Treats?
Yes, you can freeze 4th of July Rice Krispies Treats, though it may slightly change their texture. If you’re prepping ahead of a big celebration, wrap each bar tightly in plastic wrap, followed by aluminum foil. Place in a freezer-safe bag and freeze for up to 1 month. When ready to serve, let them thaw at room temperature for the best flavor and softness.
Making 4th of July Rice Krispies Treats Allergy-Friendly
Gluten-Free Adaptations
To make 4th of July Rice Krispies Treats gluten-free, ensure that both the cereal and marshmallows you use are certified gluten-free. Many traditional Rice Krispies contain malt flavoring derived from barley, so double-check labels or opt for brands specifically labeled gluten-free.
Dairy-Free and Vegan Options
Want a plant-based version? Use dairy-free butter alternatives and marshmallows that are labeled vegan. Brands like Dandies offer a great substitute that melts well and tastes just like the classic version.
Pairings and Serving Suggestions
What to Serve With 4th of July Rice Krispies Treats
-
Fresh fruit skewers
-
Lemonade or red-white-blue slushies
-
Hot dogs and grilled veggies
-
Mini flag toothpicks for decor
Party Presentation Ideas
Stack treats into a pyramid, line them up on a tray, or wrap them individually with ribbon for take-home gifts. You can even stick sparklers in them (unlit for decoration) for a real “wow” moment.
4th of July Rice Krispies Treats FAQ
How do I make patriotic 4th of July Rice Krispies treats?
Prepare three individual mixtures by melting marshmallows and butter, then stirring in cereal. Tint one batch red, leave one uncolored for white, and dye the last batch blue. Layer them in a greased pan, let set, and cut into squares.
Can you use food coloring in Rice Krispies treats?
Sure! Blend the food coloring into the warm marshmallow and butter mixture before stirring in the cereal. Add a little at a time, adjusting slowly to get the perfect hue without overdoing it.
How do you store Rice Krispies treats after 4th of July?
Store them in an airtight container at room temperature and enjoy within 3 days. For extended storage, wrap the treats tightly and freeze they’ll stay delicious for up to a month.
Can I make star-shaped 4th of July Rice Krispies treats?
Absolutely. Let them cool completely, then use a greased star cookie cutter to shape. You can even dip edges in melted white chocolate or add colored sprinkles for extra flair.
Conclusion
4th of July Rice Krispies Treats are the ultimate crowd-pleaser for your Independence Day celebration. With bold red, white, and blue layers, they bring a festive and patriotic flair to any dessert table. These no-bake treats are easy to make, require just a handful of ingredients, and are perfect for both kids and adults to enjoy.
Whether you shape your 4th of July Rice Krispies Treats into stars, serve them as stacked bars, or wrap them as party favors, they’re a fun and colorful twist on a nostalgic favorite. Their chewy texture, vibrant look, and effortless prep make them ideal for BBQs, fireworks, or summer potlucks.
Looking for more ways to sweeten your celebrations? Explore our Ultimate Summer Desserts Guide for more recipes that are just as festive and easy as these 4th of July Rice Krispies Treats.