Homemade California Crunch Roll Sushi – Ultimate Step-by-Step Guide to Make it Perfect
If you’ve ever craved restaurant-style sushi but wished you could make it fresh at home, you’re in the right place. This guide will walk you through how to make the perfect Homemade California Crunch Roll Sushi crispy on top, creamy on the inside, and packed with bold flavor.
We’ll explore the ingredients you need, the tools to use, and a step-by-step sushi-rolling technique to get you confident in your kitchen. Plus, we’ll dive into toppings, sauces, cutting techniques, health benefits, and even how to throw your own sushi night. Whether you’re a sushi lover or just getting started, this article is your ultimate guide to mastering Homemade California Crunch Roll Sushi from scratch.
Discover great ideas like our Pineapple Cucumber Salad that also make amazing appetizers to serve alongside sushi.
PART 1: Introduction to Homemade California Crunch Roll Sushi
What is a California Crunch Roll and Why It’s Loved
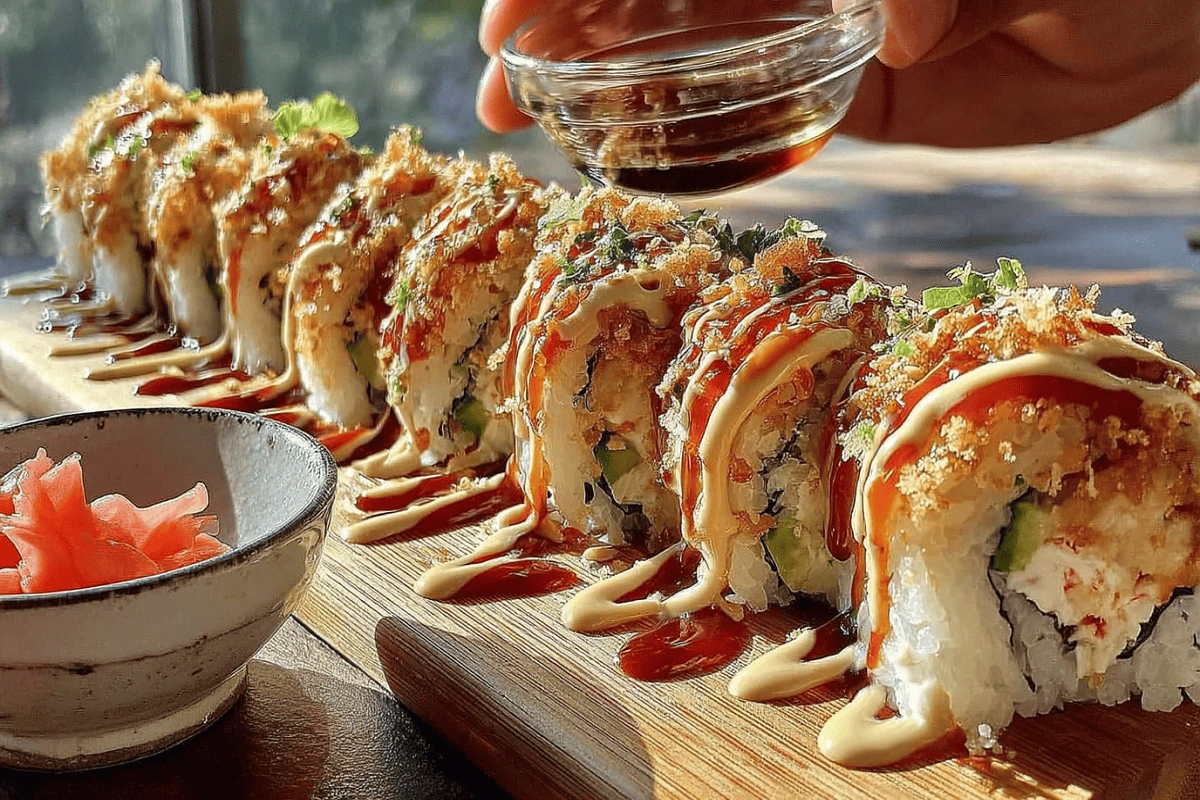
The California Crunch Roll is a fan-favorite across the U.S. because it blends the familiar and the exotic. At its core, it’s a California roll—with ingredients like imitation crab, avocado, and cucumber—but taken up a notch with crispy toppings like fried onions or panko crumbs.
What makes it truly stand out is the contrast between textures: soft sushi rice, creamy fillings, and that irresistible crunch. Unlike traditional sushi, which often contains raw fish, the Homemade California Crunch Roll Sushi is fully cooked, making it perfect for beginners or anyone hesitant about raw seafood.
This roll brings together:
-
Imitation crab (or real crab if you prefer)
-
Creamy avocado
-
Crisp cucumber
-
Sushi rice and nori
-
Spicy mayo or eel sauce
-
Topped with crunchy fried onions or panko
And the best part? You can customize your Homemade California Crunch Roll Sushi endlessly.
Difference Between Traditional and Crunchy Rolls
While traditional sushi rolls (known as maki rolls) often use raw fish like tuna or salmon and simple toppings, crunchy rolls incorporate Western elements and creative toppings. The “crunch” typically comes from:
-
Panko breadcrumbs toasted until golden
-
French fried onions
-
Tempura flakes
Unlike traditional sushi that relies heavily on fresh fish, Homemade California Crunch Roll Sushi leans into bold flavor combos and textures spicy, creamy, crispy, and savory.
You also don’t need any fancy equipment or chef-level skills. With a few practice runs and our step-by-step process, you’ll soon master your own crunchy sushi rolls at home that are not just delicious but Instagram-worthy too.
Don’t miss our Cucumber Strawberry Salad— a fresh and fruity side dish that pairs perfectly with sushi night!
PART 2: Key Ingredients for a Perfect Homemade California Crunch Roll Sushi
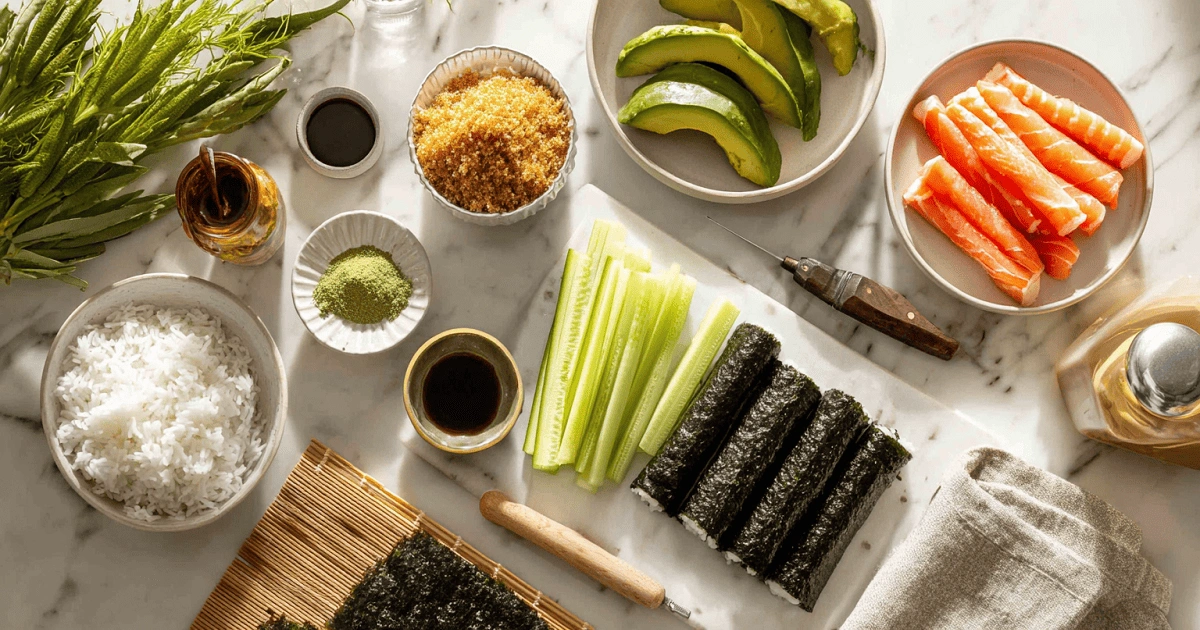
Essential Ingredients: Crab, Avocado, Cucumber, and More
The magic of a mouthwatering Homemade California Crunch Roll Sushi starts with selecting the right ingredients. While the ingredient list isn’t complicated, quality and freshness are everything when you’re making sushi at home.
Here’s what you’ll need for the classic version:
| Ingredient | Description |
|---|---|
| Imitation Crab Meat | Often used in California rolls for its mild, sweet flavor. You can also substitute with real crab or even shredded shrimp. |
| Avocado | Adds creaminess and richness. Choose ripe avocados that are slightly soft to the touch. |
| Cucumber | Brings a fresh, crisp bite to balance the softness of the avocado. Peel it or not your choice. |
| Nori (Seaweed Sheets) | Wraps the roll and holds the ingredients together. Opt for roasted nori for best results. |
| Sushi Rice | Sticky short-grain rice seasoned with rice vinegar, sugar, and salt. This is the foundation of every sushi roll. |
| Spicy Mayo | A mix of mayonnaise and sriracha. It adds heat and creaminess. |
| Eel Sauce (or Oyster Sauce) | Sweet and salty, this sauce adds umami flavor and a glossy finish. |
| French Fried Onions or Panko Breadcrumbs | The secret to that irresistible crunch on top. |
You can also add cream cheese, peppers, or even teriyaki glaze if you’re feeling creative.
Pro Tip: Prep all your fillings in advance and slice them into long, even strips. This will make assembling your sushi rolls much easier and cleaner.
Looking for inspiration? Try Easy Cowboy Caviar with Black Beans and Corn as a delicious side dish or topping twist.
Choosing the Right Rice and Nori Wraps
Let’s talk about two of the most overlooked but crucial components: rice and nori.
Sushi Rice: The Sticky Base That Holds It All Together
The best sushi starts with perfectly cooked short-grain rice. You want rice that is sticky enough to hold shape, but fluffy and tender too. After cooking, mix the rice with seasoned vinegar (a combo of rice vinegar, sugar, and salt). This gives the rice that signature sushi flavor slightly tangy, slightly sweet.
Want to go a little healthier? You can also use brown sushi rice, though it may be a bit less sticky than white rice.
Nori Wraps: The Seaweed That Holds the Roll
Not all seaweed is created equal. You’ll want to look for roasted nori sheets labeled “sushi-grade.” They should be dry, slightly shiny on one side, and flexible.
Cutting tip: If your nori sheets are large, trim them down to 3/4 size with scissors to better match the size of your roll.
Want to know more about sushi-grade nori? Check out this in-depth guide on nori from Just One Cookbook.
Learn more about how to elevate your rolls with bold flavors in our Cucumber Dill Salad a fantastic refreshing dish to serve with sushi night.
PART 3: How to Make Sushi Rice Like a Pro at Home
Ingredients and Tips for Fluffy, Sticky Sushi Rice
A great Homemade California Crunch Roll Sushi is only as good as its rice. If your sushi rice is too dry, too wet, or not seasoned right, your roll won’t hold together or taste right. The good news? You don’t need a rice cooker or chef training to make it like a pro.
Here’s your simple ingredient list for authentic sushi rice:
| Ingredient | Purpose |
|---|---|
| 1 cup short-grain white rice | The foundation of your sushi roll stickier and plumper than long-grain rice. |
| 1¼ cups water | For boiling or steaming the rice. Adjust based on your rice variety. |
| 2 tbsp rice vinegar | Adds the signature tangy sushi flavor. |
| 1 tbsp sugar | Balances the acidity and brings a gentle sweetness. |
| ½ tsp salt | Enhances flavor and balances the sweetness. |
Optional: Add a 2-inch piece of kombu (edible kelp) while cooking for an umami boost just remove it before boiling.
Here are a few key tips to get sushi rice right every time:
-
Wash your rice: Rinse under cold water until the water runs clear. This removes excess starch and prevents mushy rice.
-
Let it steam: After cooking, keep it covered off-heat for 10 minutes. This final steam helps the rice finish cooking and stay fluffy.
-
Don’t skip the seasoning: Warm up your vinegar, sugar, and salt mix, then gently fold it into the rice while it’s still warm not hot or cold.
-
Use a wooden spoon or paddle: Stir with a slicing motion rather than mashing to avoid crushing the grains.
Don’t miss our Chocolate Strawberry Frozen Yogurt Bites—another fun, cool treat to serve after your sushi feast!
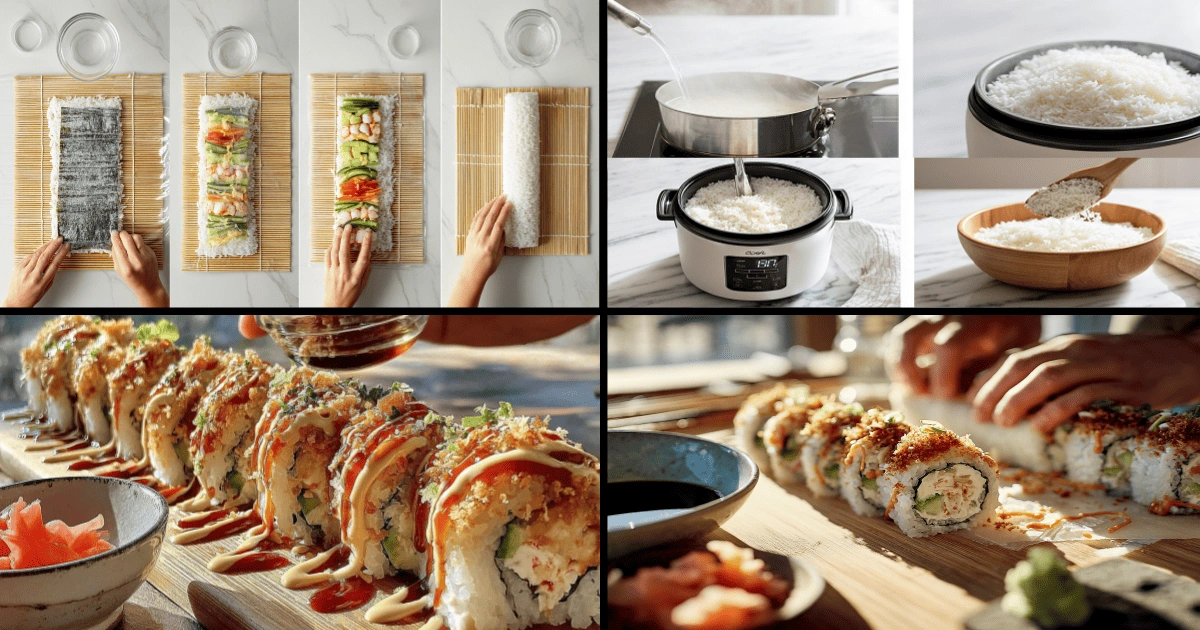
Step-by-Step Rice Preparation Process
Here’s the full breakdown for making perfect sushi rice at home:
Step 1: Rinse your rice thoroughly under cold water until it runs clear. This removes the surface starch.
Step 2: Cook the rice using a rice cooker, Instant Pot, or stovetop. The ratio is usually 1 cup rice to 1¼ cups water.
Step 3: While the rice is cooking, mix the rice vinegar, sugar, and salt in a small saucepan. Heat over low until the sugar dissolves don’t boil.
Step 4: Once your rice is done, let it sit with the lid on for 10 minutes.
Step 5: Transfer rice to a wide dish (like a wooden bowl or glass pan). Slowly pour in the seasoned vinegar and fold the rice gently using a rice paddle or wooden spatula. Use a slicing motion and fan the rice as you mix to cool it down and help it absorb the flavor.
Step 6: Let the rice cool to room temperature before using. Never use hot rice it’ll ruin your nori and roll.
This base rice works not just for Homemade California Crunch Roll Sushi, but also for classics like spicy tuna rolls, shrimp tempura rolls, or veggie maki.
Check out Cherry Cream Cheese Danish with Almond Flakes for a sweet finale after your sushi meal.
PART 4: Rolling Your Homemade California Crunch Roll Sushi with Ease
Prepping and Layering Your Ingredients
Before you roll, prep your Homemade California Crunch Roll Sushi station. Clean hands, organized ingredients, and a sushi mat make all the difference.
You’ll need:
-
A bamboo sushi mat wrapped in plastic wrap
-
A bowl of water mixed with a splash of rice vinegar (to prevent sticking)
-
Your cooled sushi rice, cut veggies, and sauces lined up
Place your plastic-wrapped bamboo mat on a clean surface. Lay a sheet of roasted nori (shiny side down) on top of the mat. With wet fingers, press a thin layer of sushi rice across the entire nori sheet, leaving a ½-inch gap at the top for sealing.
Flip the nori over so the rice side faces down. Now, layer the filling horizontally across the center:
-
Imitation crab
-
Avocado slices
-
Cucumber sticks
-
Optional cream cheese or bell pepper
-
A drizzle of spicy mayo and eel sauce
Using Plastic Wrap, Mat, and Proper Rolling Techniques
Use your thumbs to lift the mat’s edge while holding the filling in place with your fingers. Roll tightly but gently, pressing as you go. Keep rolling until you’ve sealed the edge. Use the mat to gently press and shape the roll into a firm cylinder.
Pro tip: Don’t overfill! Too much filling will cause the roll to burst.
PART 5: Adding the Signature Crunch to Your Roll
What Makes the Crunch? Fried Onions, Panko & More
What sets the Homemade California Crunch Roll Sushi apart is the irresistible texture from the crunchy topping. You can pick from:
-
French fried onions (ready-to-use and deeply flavorful)
-
Toasted panko breadcrumbs (light and crisp)
-
Tempura flakes (if you have leftover batter bits from fried shrimp)
You can even combine two for a dramatic, chef-style look.
When and How to Add the Crunchy Toppings
Once your roll is shaped and sealed, brush the top with a little spicy mayo or eel sauce—this helps the crunchy topping stick.
Sprinkle your choice of topping generously. Then, use the sushi mat once more to lightly press the topping into the roll for better hold.
Right before serving, slice your roll with a sharp, damp knife. Each cross-section should show the colorful filling, surrounded by sticky rice and a crown of golden crunch.
Don’t miss our Cucumber Dill Salad as a crisp, cooling companion to your crunchy roll masterpiece.
PART 6: Toppings and Sauces That Elevate the Flavor
Spicy Mayo, Eel Sauce, and Cream Cheese Options
What truly elevates your Homemade California Crunch Roll Sushi beyond ordinary sushi is the finishing layer of toppings and sauces. These not only add extra flavor but also enhance the roll’s appearance.
The most iconic sauces are:
-
Spicy Mayo: A mix of mayo and sriracha (2:1 ratio). Adds heat and creaminess.
-
Eel Sauce: Sweet, salty, and savory. Drizzle over the top for richness.
-
Oyster Sauce Glaze: A deeper umami flavor, often mixed with soy sauce and sugar.
-
Teriyaki Sauce: For those who love a sweet-savory balance.
For extra indulgence, many sushi lovers add a thin layer of cream cheese inside the roll. This gives the sushi a rich, velvety texture that complements the crunch.
Want to take it a step further? Top your roll with thin slices of jalapeño, a sprinkle of sesame seeds, or even a touch of chili oil for a spicy finish.
Check out our Chocolate Strawberry Frozen Yogurt Bites to cool off after a bold sushi feast.
PART 7: Slicing and Plating Your Sushi Roll the Right Way
Tools You’ll Need to Cut Sushi Cleanly
Slicing your roll is the final step and it’s where presentation matters most. To slice Homemade California Crunch Roll Sushi like a pro, here’s what you’ll need:
-
A sharp serrated knife
-
Rice vinegar or cold water
-
A clean kitchen towel
Wet the knife between each cut to prevent the rice from sticking. Use gentle sawing motions instead of pressing straight down. This ensures clean, even pieces.
Plating Tips to Impress Guests or Family
For impressive presentation:
-
Arrange your slices on a rectangular or bamboo plate
-
Garnish with extra crunchy toppings, sauce drizzles, or wasabi dots
-
Add a side of soy sauce, pickled ginger, and wasabi paste
Hosting a casual dinner? Serve your rolls with our Cherry Cream Cheese Danish for a sweet finish.
With these final touches, your Homemade California Crunch Roll Sushi will look and taste like it came from a high-end sushi bar.

PART 8: Nutritional Value and Healthier Alternatives
Is the California Crunch Roll Healthy?
The short answer? Homemade California Crunch Roll Sushi can absolutely be part of a balanced diet especially when made at home, where you control every ingredient.
Here’s a quick overview of the average roll (8 pieces):
| Component | Calories (approx.) |
|---|---|
| Sushi rice | 140–200 kcal |
| Imitation crab | 80–100 kcal |
| Avocado & cucumber | 50–60 kcal |
| Spicy mayo & eel sauce | 80–120 kcal |
| Fried onions/panko | 70–100 kcal |
So yes, the classic version may be a little indulgent, especially due to the sauces and toppings. But when homemade, it’s easy to make lighter swaps without losing flavor.
For a full breakdown of sushi calories, refer to this calorie analysis of sushi rolls by Healthline.
Swaps for Low-Carb, Gluten-Free, and Vegan Options
Want to boost the health profile of your Homemade California Crunch Roll Sushi? Try these alternatives:
-
Low-carb: Use cauliflower rice instead of traditional sushi rice.
-
Gluten-free: Use tamari in place of soy sauce and check that your imitation crab and eel sauce are gluten-free.
-
Dairy-free/vegan: Replace imitation crab with marinated tofu or hearts of palm and skip cream cheese.
Explore more clean options like our Cucumber Strawberry Salad a refreshing side that complements lighter sushi versions.
PART 9: Hosting a Homemade Sushi Party with Style
How to Set Up a Sushi Station for Friends or Family
If you’ve mastered making Homemade California Crunch Roll Sushi, why not share the fun? Hosting a DIY sushi party is interactive, memorable, and surprisingly simple.
Here’s what to prep:
-
A rolling station with bamboo mats and plastic wrap
-
Bowls of sushi rice
-
Plates of fillings (crab, avocado, cucumber, etc.)
-
A toppings bar with sauces and crunchies
-
Dipping sauces like soy, spicy mayo, and eel sauce
Encourage each guest to create their own roll it’s a great icebreaker.
Fun Ideas for Customizable Sushi Night
-
Theme your rolls: Add shrimp tempura, mango, or spicy tuna.
-
Offer rice-free rolls for keto guests.
-
Create a sushi competition and let people vote!
-
Serve appetizers like our Easy Cowboy Caviar for variety.
Round out the night with something cool like our Pineapple Cucumber Salad a perfect balance to your savory rolls.
Hosting your own Homemade California Crunch Roll Sushi night is more than a meal it’s an experience your guests won’t forget.
Frequently Asked Questions About Homemade California Crunch Roll Sushi
What does the California Crunch Roll have?
A classic California Crunch Roll includes imitation crab, avocado, and cucumber, rolled in seasoned sushi rice and nori. It’s topped with spicy mayo, eel sauce, and crunchy elements like French fried onions or panko breadcrumbs.
What is in a California roll of sushi?
A traditional California roll contains imitation crab (or real crab), cucumber, and avocado, all wrapped in sushi rice and nori. It’s a fully cooked roll and often served with soy sauce, wasabi, and pickled ginger.
Is California Crunch Roll raw?
No. Homemade California Crunch Roll Sushi is made with cooked ingredients like imitation crab and does not contain raw fish. That makes it beginner-friendly and perfect for those who prefer cooked sushi.
What is crunch in sushi made of?
The “crunch” typically comes from toasted panko breadcrumbs, tempura flakes, or store-bought French fried onions. These toppings are added after rolling for texture and visual appeal.
Is California Crunch Roll actually healthy?
It can be! When you make it at home, you control the portions, sauces, and toppings. Opting for brown rice, less mayo, and more veggies makes your Homemade California Crunch Roll Sushi a more nutritious option.
What is crunch roll?
A crunch roll is a variation of sushi topped with crispy elements. While fillings vary, the standout feature is the added texture from toppings like fried onions or tempura flakes, usually paired with rich sauces.
Conclusion: Master the Art of Homemade California Crunch Roll Sushi
Whether you’re making sushi for the first time or perfecting your technique, this guide shows how fun, easy, and delicious it can be to prepare Homemade California Crunch Roll Sushi. With simple ingredients, creative toppings, and step-by-step methods, anyone can turn their kitchen into a sushi bar.
Discover great ideas like our Pineapple Cucumber Salad or end your sushi night with something sweet like Cherry Cream Cheese Danish.
So grab your mat, prep your rolls, and invite friends because homemade sushi nights are here to stay.