Knock You Naked Bars: The Ultimate Caramel Cookie Bar Recipe That’ll Blow Your Mind
If you’re looking for a dessert that’s ooey, gooey, and impossible to resist, Knock You Naked Bars should be at the top of your list. These insanely delicious cookie bars are layered with melted caramels, chocolate chips, and just the right touch of peanut butter. Whether you’re hosting a party, heading to a potluck, or craving a sweet treat at home, this easy-to-make recipe will leave everyone begging for more.
In this detailed guide, we’ll walk you through every step of making the best Knock You Naked Bars from scratch. We’ll cover essential baking tips, ingredient swaps for dietary needs, creative add-ins, and common questions like “Can I make these nut-free?” or “How do I know when they’re done?”
Don’t miss our Caramel Crunch Cake for another nut-free dessert packed with sticky-sweet satisfaction.
PART 1: The Craze Behind Knock You Naked Bars
What Makes Knock You Naked Bars So Popular?
Knock You Naked Bars have gone viral across Pinterest and recipe blogs for a reason they deliver outrageous flavor with simple steps. What makes them special is the triple-layer structure: a soft cookie dough base, a rich caramel center, and a chocolate-studded topping. That combination creates the perfect bite every single time.
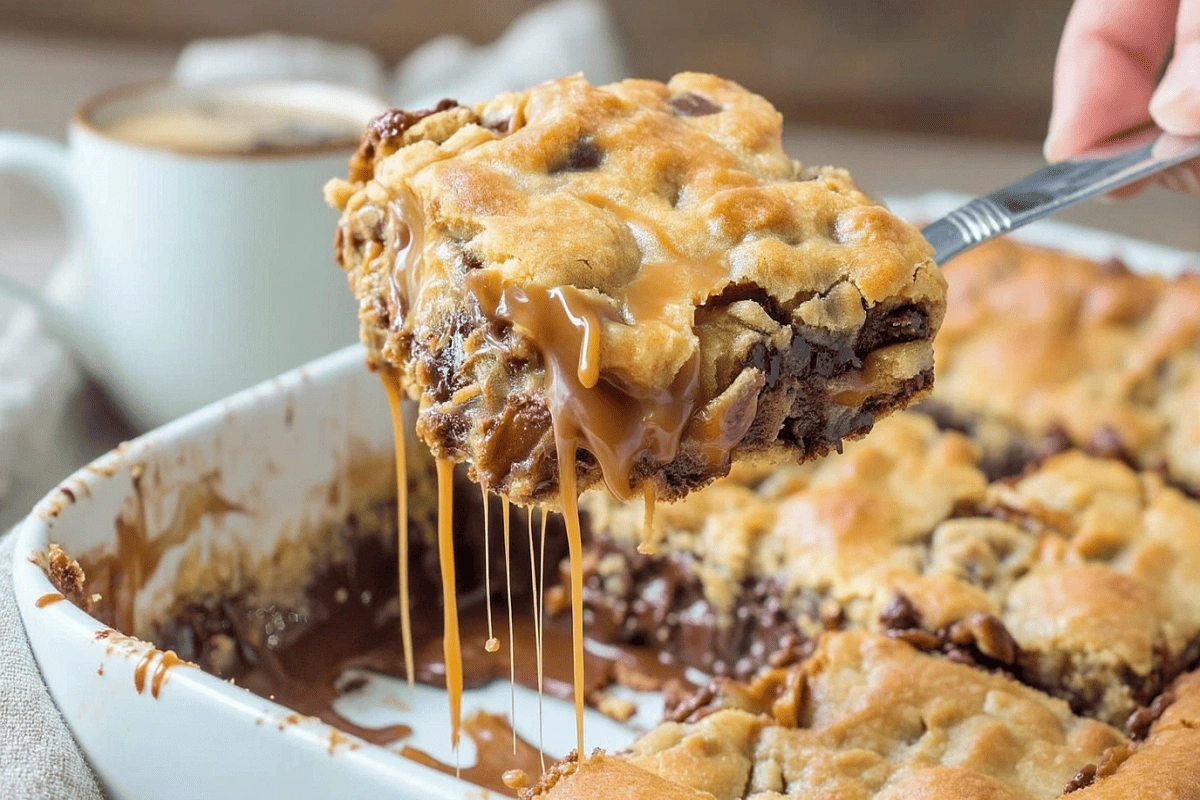
Their name grabs attention, but it’s the decadent taste that gets people hooked. When served slightly warm, the melted caramel oozes between the cookie layers in the most satisfying way possible.
The Origins and Name Explained
Despite their cheeky name, these bars have humble Midwestern roots. The term “Knock You Naked” isn’t literal it’s a playful way to describe how shockingly good they are. The name likely originated in church cookbooks or local baking contests where a fun title helps a recipe stand out.
They’re a spin-off of traditional cookie bars but elevated by the gooey center, making them perfect for indulgent dessert tables and bake sales.
PART 2: Key Ingredients in Knock You Naked Bars
Essential Ingredients Breakdown
At the heart of every irresistible Knock You Naked Bar is a carefully balanced lineup of pantry staples and indulgent add-ins. Let’s walk through the core ingredients you’ll need and what each one brings to the table.
| Ingredient | Purpose in Recipe |
|---|---|
| All-Purpose Flour | Forms the structure of the cookie base and top layer |
| Butter | Adds richness and moist texture to the dough |
| Brown & White Sugar | Combines to create a perfectly balanced sweet cookie flavor |
| Eggs | Help bind the dough and give structure |
| Vanilla Extract | Boosts the aroma and brings warmth to the flavor |
| Baking Soda & Salt | Ensures rise and flavor balance |
| Semi-Sweet Chocolate Chips | Add bursts of chocolate that complement the caramel |
| Caramels (wrapped) | Melted to form that iconic gooey center |
| Evaporated Milk | Thins and smooths the melted caramel without over-sweetening |
| Peanut Butter | Adds depth, creaminess, and a savory note to the filling |
You can use name brands like Kraft for caramels and Nestlé or Ghirardelli for chocolate chips, but even store brands will yield excellent results.
Substitutes and Allergy-Friendly Options
Have dietary restrictions or just missing an ingredient? No problem here’s how to adapt.
-
Butter Substitute: Use vegan butter or margarine for dairy-free versions.
-
Egg Replacement: For each egg, use 1 tbsp ground flaxseed + 3 tbsp water (let sit 5 min).
-
Gluten-Free Swap: Choose a 1:1 gluten-free baking flour mix for a celiac-safe version.
-
Nut-Free Option: Replace peanut butter with sunflower seed butter or skip it entirely just note the filling may be less rich.
-
Caramel Alternative: If you can’t find individually wrapped caramels, use a jar of thick caramel sauce (reduce milk slightly).
Check out our Chocolate Chip Cookie Guide if you’re trying to level up your cookie base for these bars.
By customizing these ingredients, you can tailor Knock You Naked Bars to fit nearly any diet or preference without sacrificing flavor.
PART 3: Step-by-Step Recipe: How to Make Knock You Naked Bars
Preparing the Cookie Dough Layers
Creating the dough for Knock You Naked Bars is like making your favorite chocolate chip cookie recipe but with a twist.
Step-by-step instructions for the base and topping:
-
Preheat and prep
Set your oven to 375°F and grease a 9×13 inch baking pan. Line with parchment paper if you want clean edges when slicing. -
Mix dry ingredients
In a medium bowl, whisk together:-
2 ¼ cups all-purpose flour
-
1 tsp baking soda
-
1 tsp salt
-
-
Cream butter and sugars
In a large bowl, beat together:-
1 cup softened butter
-
¾ cup granulated sugar
-
¾ cup packed brown sugar
-
1 tsp vanilla extract
Beat the mixture for about 2 minutes, until it’s light, airy, and fluffy this step helps create that perfect cookie texture.
-
-
Add eggs
Mix in 2 eggs, one at a time, beating after each until fully incorporated. -
Combine wet and dry
Slowly add your flour mixture into the wet mix. Stir until just combined—don’t overmix. -
Fold in chocolate chips
Fold in 2 cups of semi-sweet chocolate chips and mix just until they’re evenly spread throughout the dough every bite should get a little chocolatey love. -
Layer one
Press half the cookie dough into your prepared pan. Smooth it into an even layer using a spatula or the back of a spoon. -
Bake the base
Bake for 8–10 minutes. The dough should look slightly set but not fully baked. Remove from oven and let it rest.
Looking for inspiration? Try Raspberry Shortbread Cookie Bars with White Chocolate Drizzle for another amazing layered treat.
Melting the Caramel Filling the Right Way
Now for the star of the show the gooey middle layer of melty caramel swirled with just a touch of peanut butter. It’s rich, dreamy, and totally irresistible. The secret is low heat and constant stirring.
Here’s how to make it silky smooth:
-
Set up a double boiler
Place a heat-safe bowl over a saucepan with simmering water (don’t let the bowl touch the water). Alternatively, microwave in 30-second intervals. -
Melt the caramel
Add:-
1 (14 oz) bag of individually wrapped caramels (unwrapped, of course)
-
5 oz evaporated milk
Stir frequently until the caramels are completely melted.
-
-
Add peanut butter
Stir in ½ cup of peanut butter creamy for smooth and luscious, or crunchy if you’re after a little extra texture. Totally your call! Stir until everything is blended and smooth. -
Layer two
Pour the caramel mixture over the pre-baked cookie base. Spread evenly. -
Top layer dough
Take the remaining cookie dough and drop it by spoonfuls over the caramel. Don’t worry about full coverage the dough will spread during baking. -
Final bake
Return the pan to the oven. Bake for 15–20 minutes or until the top is golden brown. Let cool completely before cutting to avoid caramel lava eruptions.
Don’t miss our Salted Caramel Apple Pie Bars for another caramel-filled classic.
PART 4: Pro Baking Tips for Gooey Perfect Results
How to Tell When the Bars Are Perfectly Baked
Getting the timing just right is the difference between undercooked and over-baked bars. Here’s how to make sure yours turn out perfectly gooey in the center and golden on top.
Visual cues to watch for:
-
You’ll know it’s ready when the edges turn a light golden brown and gently pull away from the sides of the pan it’s the perfect sign of doneness.
-
The top dough layer should be set and matte, not shiny or wet-looking.
-
The caramel may bubble slightly around the edges this is a good sign!
Time reference:
-
First bake (base only): 8–10 minutes
-
Second bake (with topping): 15–20 minutes
But keep in mind: ovens vary. If your oven runs a little hot or cool, be sure to adjust the temperature or bake time as needed every oven’s a bit different!
Pro tip: Insert a toothpick near the center (not too deep into the caramel). Your tester should come out with a few moist crumbs clinging to it not raw batter. That’s when you know it’s just right.
Tips for Easy Slicing and Serving
There’s nothing worse than mangling your dessert during slicing. These tips ensure every square comes out Insta-worthy.
1. Let them cool completely
Do not skip this! The caramel firms up as it cools. Cutting too soon = sticky mess. Let sit for at least 1 hour, or chill in the fridge for cleaner slices.
2. Use a hot knife
For clean, smooth slices, run your knife under hot water, then wipe it dry before cutting repeat between slices for the neatest results.
3. Line your pan with parchment paper
Leave some overhang so you can lift the whole slab out of the pan before slicing. This avoids scraping with a spatula and keeps edges clean.
4. Store right for best texture
Bars taste best at room temperature. If you refrigerated for slicing, let them sit out for 10–15 minutes before serving.
Discover great ideas like Lemon Oatmeal Crumble Bars if you’re a fan of square-shaped desserts that cut clean and stay firm.
PART 5: Creative Variations and Add-ins to Try
Nut-Free Knock You Naked Bars Options
If you or someone you’re baking for has a nut allergy, don’t worry these bars are just as dreamy without the peanut butter.
Here are a few easy modifications:
1. Omit the peanut butter entirely
You’ll still get a rich, gooey caramel center. Just increase the caramels slightly (about 2 oz more) for better thickness.
2. Swap for a safe alternative
Use a nut-free butter like:
-
Sunflower seed butter
-
Soy nut butter
-
Wowbutter
These options have a similar creamy texture and a subtle nutty flavor that mimics peanut butter beautifully without the allergens.
3. Choose nut-free chocolate chips
While most chips are naturally nut-free, double-check the label to ensure they weren’t processed in facilities with peanuts or tree nuts.
Don’t miss our Caramel Crunch Cake for another nut-free dessert packed with sticky-sweet satisfaction.
Fun Mix-In Ideas to Customize Your Bars
Want to elevate the classic version? Here are some creative add-ins that still play well with the gooey caramel core.
1. Candy bar chunks
-
Chopped Snickers, Rolos, or Milky Way bars melt slightly into the caramel for extra decadence.
2. Sea salt flakes
-
Sprinkle flaky sea salt on top right after baking to balance the sweetness and give it a gourmet edge.
3. Toasted coconut
-
Fold ½ cup into the cookie dough for sweet pockets of flavor, or sprinkle it on top just before baking for a pretty, tasty finish.
4. Chopped pretzels
-
Adds salty crunch to the cookie dough and balances out the caramel beautifully.
5. White chocolate or butterscotch chips
-
Swap some (or all) of the chocolate chips for a different sweet profile.
6. Espresso powder
-
Add 1 tsp to the cookie dough to deepen the flavor without tasting like coffee.
Check out our Juicy Pineapple Heaven Cake for another tropical spin on classic sweetness.
Customizing your Knock You Naked Bars doesn’t just make them unique it helps them stand out on dessert tables, bake sales, or as holiday gifts.
PART 6: Are Knock You Naked Bars Gluten-Free or Vegan Friendly?
Gluten-Free Flour Alternatives
If you’re baking for someone with celiac disease or gluten sensitivity, the good news is you can absolutely make Knock You Naked Bars gluten-free. You just need the right flour substitute and a few simple adjustments.
Best flour swaps (1:1 replacements):
-
Bob’s Red Mill Gluten-Free 1-to-1 Baking Flour
-
King Arthur Measure for Measure Gluten-Free Flour
-
Cup4Cup Multipurpose Flour
These options mimic the texture of traditional all-purpose flour and already contain xanthan gum, so no need to add extra binders.
Tips for gluten-free success:
-
Chill your dough slightly before pressing it into the pan. GF dough can be stickier.
-
Don’t overmix gluten-free flour blends can get gummy if overworked.
-
Double-check that your caramels, chocolate chips, and baking powder are certified gluten-free.
Check out our Banana Bread Bars for another easy-to-convert dessert into a gluten-free option.
Making a Vegan Version
Veganizing this recipe requires a few swaps—but the final result? Still rich, chewy, and completely crave-worthy.
Egg replacement options:
| Replacement | Use For Each Egg |
|---|---|
| Flax egg | 1 tbsp flaxseed + 3 tbsp water (let sit 5 mins) |
| Applesauce | ¼ cup unsweetened applesauce |
| Mashed banana | ¼ cup mashed banana (adds slight banana flavor) |
Butter alternatives:
-
Vegan buttery sticks (like Earth Balance)
-
Refined coconut oil (use slightly less than butter)
Caramel layer hacks:
-
Most traditional caramels contain dairy. For a vegan version:
-
Use vegan caramels (such as Cocomels)
-
Or make your own using coconut milk, maple syrup, and almond butter.
-
Chocolate chips:
-
Choose dairy-free brands like Enjoy Life or Hu Kitchen.
Bonus tip: Chill vegan versions after baking to help them set firmly, as they’re typically a bit softer.
PART 7: How to Store and Freeze Knock You Naked Bars
Best Storage Methods to Keep Them Fresh
Once your Knock You Naked Bars have cooled completely and been sliced into squares, you’ll want to store them properly to lock in that soft, chewy texture.
At Room Temperature:
-
Store in an airtight container lined with parchment or wax paper.
-
Separate layers with paper to prevent sticking.
-
Keep in a cool, dry place for up to 4 days.
In the Fridge:
-
If your kitchen is warm or humid, refrigeration can help maintain structure.
-
Keep bars in a sealed container and bring to room temp before serving for the best texture.
Serving Tip: For a bakery-style finish, microwave individual bars for 8–10 seconds before eating to soften the caramel and melt the chocolate slightly.
Check out our Blueberry Cheesecake Swirl Cookies if you love treats that store and reheat well, just like these bars.
Freezer-Friendly Prep and Thawing Tips
Planning ahead for a party or saving some for later? Go ahead and make a batch in advance these freeze beautifully and are perfect for satisfying future cravings in a pinch. Knock You Naked Bars freeze beautifully if you follow these steps.
How to Freeze Them:
-
Let bars cool and slice them into squares.
-
Wrap each bar snugly in plastic wrap or parchment paper to keep them fresh, prevent sticking, and make grab-and-go snacking a breeze.
-
Place all wrapped bars into a freezer-safe zip-top bag or container.
-
Label and date your container.
They’ll stay fresh in the freezer for up to 2 months.
To thaw and serve:
-
Unwrap individual bars and let them thaw at room temperature for 30–45 minutes.
-
For a quick fix, microwave a frozen bar for 15–20 seconds (watch the caramel—it gets hot fast).
Pro Tip: Frozen bars make excellent emergency desserts or gifts just wrap them with a ribbon and you’re ready to impress.
PART 8: Best Occasions to Serve Knock You Naked Bars
Potlucks, Parties, and Family Gatherings
Knock You Naked Bars aren’t just a dessert they’re total crowd-pleasers that disappear the moment they hit the table. Whether you’re heading to a school bake sale, a backyard BBQ, or hosting Thanksgiving dessert, these bars always steal the spotlight.
Why they work for group events:
-
Easy to transport: Bake them in a single pan, slice, and stack in a container.
-
Mess-free serving: No forks, spoons, or plates needed—perfect for grab-and-go.
-
Universal flavors: Who doesn’t love gooey caramel, peanut butter, and chocolate?
Pro move: Double the batch and use a larger baking dish. They’ll disappear fast.
Looking for inspiration? Try Chocolate Chip Cookies if you need a simpler option to pair on your dessert table.
Pairing Ideas: Ice Cream, Coffee, and More
Want to level up Knock You Naked Bars into something even more decadent? Serve them with pairings that complement their rich, buttery texture and gooey center.
Delicious pairings:
| Pairing | Why It Works |
|---|---|
| Vanilla bean ice cream | Balances the warm caramel and chocolate layers |
| Espresso or strong coffee | Cuts through the richness and enhances the chocolate |
| Salted caramel drizzle | Doubles down on the gooey factor drizzle before serving |
| Whipped cream + berries | Adds lightness and color to the presentation |
| Hot cocoa with marshmallows | Cozy winter pairing for holiday desserts |
Check out our Blueberry Pretzel Salad for another unique dish that complements rich treats like Knock You Naked Bars.
Pro serving tip: Warm bars slightly before serving and add a scoop of ice cream right on top. The contrast of hot and cold, chewy and creamy? Game-changer.
PART 9: Frequently Asked Questions About Knock You Naked Bars
What are Knock You Naked Bars?
Knock You Naked Bars are rich, layered dessert bars featuring chewy chocolate chip cookie dough, a gooey caramel-peanut butter center, and all the indulgence you could ever crave in one bite. They’re baked in two stages first for the bottom layer, then again after the caramel and top dough are added. The result is an ultra-rich, chewy treat that’s part cookie, part candy bar.
They earned their quirky name from old-school Midwestern potluck culture, where dishes with outrageous names often drew the most attention and in this case, it’s totally deserved.
Can I make these bars without nuts?
Yes! You can absolutely make Knock You Naked Bars nut-free. Just omit the peanut butter or replace it with a safe alternative like sunflower seed butter. The bars will still have a gooey caramel middle, and the cookie layers won’t be affected at all.
For best results, slightly increase the amount of caramels if omitting the peanut butter entirely, so the filling stays thick and luscious.
How do I know when the bars are done baking?
You’ll know your Knock You Naked Bars are ready when:
-
The top layer turns a light golden brown.
-
The caramel is bubbling gently at the edges.
-
The center appears set not jiggly or shiny.
Be sure to let the bars cool completely before slicing—this gives the caramel time to set, so each piece holds its shape perfectly. For cleaner slices, use a hot knife.
Are these bars gluten-free?
The classic recipe is not gluten-free, but it’s very easy to adapt! Use a 1-to-1 gluten-free baking flour mix, such as King Arthur or Cup4Cup, to replace the all-purpose flour. Also, check that your caramels and chocolate chips are gluten-free certified.
The result? Perfectly chewy gluten-free Knock You Naked Bars with no sacrifice in flavor or texture.
Can I add other mix-ins to the dough?
Absolutely! Knock You Naked Bars are extremely customizable. Try folding in:
-
White chocolate or butterscotch chips
-
Toasted coconut flakes
-
Pretzel pieces
-
Chopped candy bars (Snickers, Rolos, etc.)
These mix-ins add texture and flavor layers that elevate the classic bar into something unique every time you bake it.
Conclusion: Why You’ll Keep Coming Back to Knock You Naked Bars
Knock You Naked Bars aren’t just another cookie bar they’re the kind of dessert you dream about days after the last bite. With their buttery cookie base, gooey caramel center, and that melt-in-your-mouth chocolate chip top, they hit every craving in one chewy, sweet square.
Whether you’re making them for a party, a cozy night in, or freezing a batch for emergency desserts, Knock You Naked Bars deliver every time. You can keep them classic or put your own twist on them with fun mix-ins and dietary adaptations.
So go ahead make a double batch. You’ll be glad you did.
Don’t miss our Chocolate Fudge Truffle Cheesecake if you want another dessert that’s equally over-the-top.