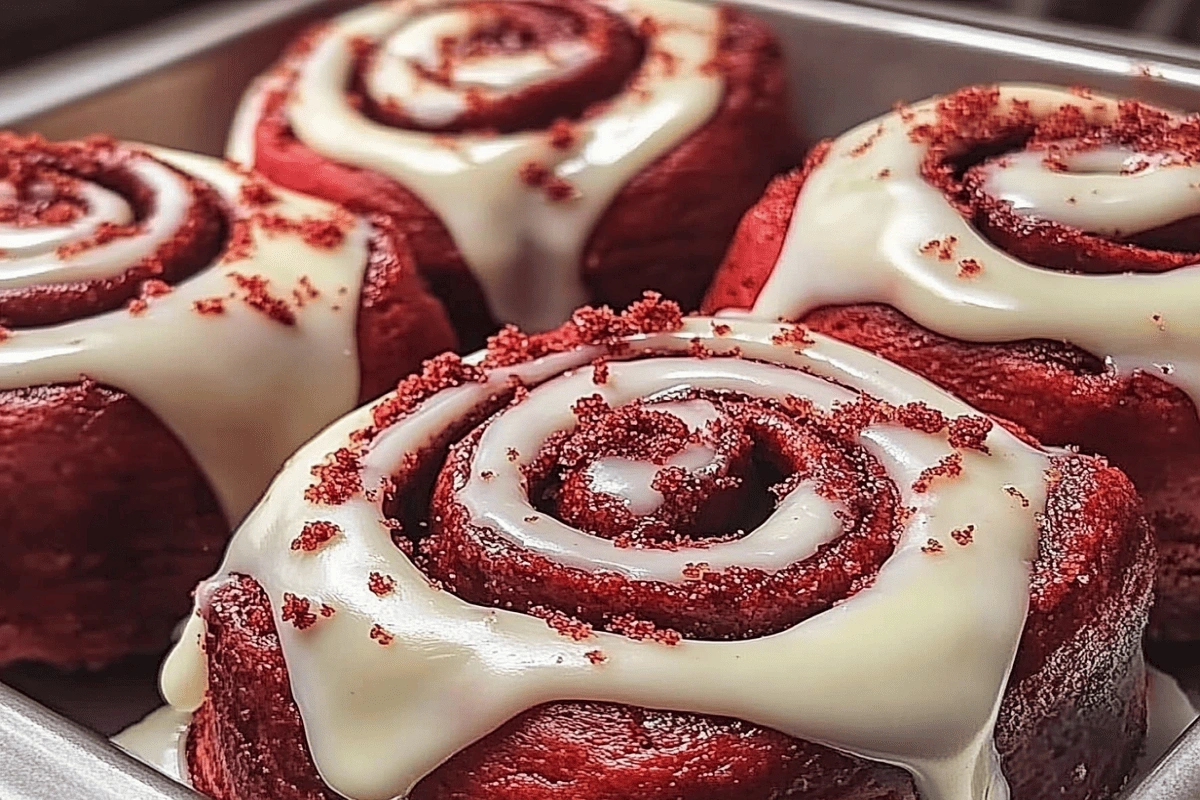
Red Velvet Cinnamon Rolls – The Ultimate Swirled Dessert Everyone Will Love
Red Velvet Cinnamon Rolls are the bold, beautiful upgrade your sweet tooth didn’t know it needed. Combining the rich cocoa undertones of red velvet cake with the gooey, cinnamon-laced swirl of a classic roll, these treats bring drama and decadence to your dessert table. Perfect for festive occasions or lazy weekend brunches, they’re a favorite for anyone who loves a fusion of flavor, texture, and eye-catching color.
In this article, we’ll explore everything you need to know about crafting these decadent pastries from scratch. From understanding the key ingredients and baking techniques to creating the perfect cream cheese frosting and knowing how to store them for later, we’ve got you covered. Plus, we’ll answer your top questions about red velvet flavor and history so stick around.
Don’t miss our Fudgy Red Velvet Brownies – 7 Proven Tips for Gooey Perfection if you’re craving more red velvet goodness.
What Are Red Velvet Cinnamon Rolls?
The origin of red velvet meets cinnamon swirl
Red Velvet Cinnamon Rolls are a hybrid dessert that merges two American classics into one unforgettable bite. Red velvet cake, with its soft crumb and vibrant color, dates back to the early 1900s and is deeply rooted in Southern cuisine. According to Southern Living’s Southern Red Velvet Cake recipe, this iconic dessert is known for its mild cocoa flavor, slight tang from buttermilk, and signature scarlet hue qualities that make it perfect for transforming into a rolled pastry like Red Velvet Cinnamon Rolls.
Cinnamon rolls, on the other hand, trace back to Scandinavian baking traditions and have become a beloved comfort food across the globe. When these two flavors come together, they create a dessert that’s visually striking, richly layered, and endlessly satisfying.
The red velvet component introduces a touch of cocoa, tangy undertones, and a velvety texture. The cinnamon swirl brings warmth, buttery richness, and just the right amount of spice. Together, they form a roll that’s not just sweet it’s decadent.
This unique fusion of color, aroma, and texture has elevated Red Velvet Cinnamon Rolls from a fun twist to a bakery-worthy showstopper. Whether it’s for brunch, special holidays, or a leisurely weekend indulgence, these rolls are sure to leave a lasting impression.
The rise of red velvet cinnamon rolls is thanks, in part, to their viral success on platforms like Pinterest, Instagram, and TikTok. Their deep red spirals topped with thick cream cheese frosting make them highly photogenic, but it’s the flavor and softness that keeps bakers coming back.
Unlike traditional cinnamon rolls, which focus on pure sweetness and spice, red velvet versions offer more depth. The cocoa and red coloring create a rich, almost cake-like effect, while the frosting adds creamy tang. In short, they’re comfort food with a stylish twist.
And they’re not just for social media either. More home bakers are adding these to their repertoire because they’re surprisingly easy to make and wildly versatile. Add-ins like chocolate chips, flavored frosting, or even a drizzle of white chocolate can elevate the rolls to gourmet status.
Print
Red Velvet Cinnamon Rolls – The 9 Best Tips for Perfect Homemade Swirls
- Total Time: 55 minutes (auto-calculated: Prep + Cook)
- Yield: 12 servings
- Diet: Vegetarian
Description
Fluffy, rich red velvet cinnamon rolls swirled with brown sugar and cinnamon, baked to perfection, and topped with a smooth cream cheese glaze that melts right into every bite. These are the ultimate cozy morning treat or brunch showstopper!
Ingredients
For the Dough:
• 3½ cups all-purpose flour (plus more for kneading)
• ¼ cup granulated sugar
• 1 packet (2¼ tsp) active dry yeast
• 1 tsp baking powder
• ½ tsp salt
• 1 cup whole milk, warmed
• ¼ cup unsalted butter, melted
• 1 large egg
• 1 tsp vanilla extract
• 1½ tbsp unsweetened cocoa powder
• 1–2 tbsp red food coloring (or 1 tbsp beet powder for natural option)
For the Filling:
• ½ cup unsalted butter, softened
• 1 cup packed brown sugar
• 1 tbsp ground cinnamon
• ½ cup mini chocolate chips (optional)
For the Cream Cheese Frosting:
• 6 oz cream cheese, softened
• 4 tbsp unsalted butter, softened
• 1½ cups powdered sugar
• 1 tsp vanilla extract
• 2–3 tbsp milk (adjust for consistency)
Instructions
1️⃣ Make the Dough:
• In a large bowl, mix 2 cups flour, sugar, yeast, baking powder, salt, and cocoa powder.
• In another bowl, whisk together warm milk, melted butter, egg, vanilla, and food coloring.
• Combine the wet and dry ingredients and mix until smooth. Gradually add the remaining flour until a soft, sticky dough forms.
• Knead on a floured surface for 5–7 minutes until smooth and elastic.
• Place dough in a greased bowl, cover, and let rise for 1 hour or until doubled in size.
2️⃣ Make the Filling:
• Mix softened butter, brown sugar, and cinnamon until well combined.
3️⃣ Roll, Fill & Slice:
• On a floured surface, roll out the dough into a 12×18-inch rectangle.
• Spread the cinnamon filling evenly across the dough.
• Sprinkle mini chocolate chips over the top (if using).
• Roll the dough up tightly from the long side. Slice into 12 even rolls.
• Place rolls in a greased 9×13-inch pan. Cover and let rise for 30 minutes.
4️⃣ Bake:
• Preheat oven to 350°F (175°C).
• Bake for 25–30 minutes, or until tops are set and slightly golden.
• Remove from oven and let cool for 10 minutes before frosting.
5️⃣ Make the Frosting:
• Beat cream cheese and butter until smooth and creamy.
• Gradually add powdered sugar, then mix in vanilla and milk until the frosting reaches desired consistency.
• Spread generously over warm rolls.
Notes
Red Food Coloring Alternatives:
Want a natural version? Swap traditional food coloring with beet powder, raspberry juice, or pomegranate concentrate. You’ll still get that rich red hue without artificial dyes.
Make Ahead Tip:
You can prep the rolls the night before. After shaping, cover and refrigerate. Let them come to room temperature and rise for 45 minutes before baking in the morning.
Dough Rising Tip:
Place your dough in a slightly warm (not hot) oven or inside your microwave with the light on to help it rise faster in cooler kitchens.
Vegan or Dairy-Free Option:
Use plant-based milk, vegan butter, and dairy-free cream cheese to enjoy a fully plant-based version of these indulgent rolls.
Add-Ins for Extra Flavor:
Mini chocolate chips, chopped pecans, or a swirl of Nutella can be added to the filling for a richer twist.
Storing Leftovers:
Keep frosted rolls in an airtight container in the fridge for up to 5 days. Reheat in the microwave for 15–30 seconds for soft, gooey results.
Freezing Instructions:
Freeze unfrosted rolls after baking. Wrap individually and store for up to 2 months. Thaw overnight and warm before frosting.
Frosting Tip:
For a lighter glaze, thin the frosting with milk. For a thicker spread, reduce the milk or add more powdered sugar.
- Prep Time: 25 minutes
- Cook Time: 30 minutes
- Category: Dessert
- Method: Baking
- Cuisine: American
Nutrition
- Serving Size: 1 cinnamon roll
- Calories: 390 kcal
- Sugar: 28 g
- Sodium: 240 mg
- Fat: 17 g
- Saturated Fat: 10 g
- Unsaturated Fat: 6 g
- Trans Fat: <0.5 g
- Carbohydrates: 54 g
- Fiber: 1 g
- Protein: 5 g
- Cholesterol: 55 mg
Keywords: Red Velvet Cinnamon Rolls, red velvet rolls, cinnamon swirl rolls, cream cheese frosted rolls, red velvet dessert, holiday cinnamon rolls, sweet brunch rolls, chocolate cinnamon rolls, red velvet yeast rolls, red velvet breakfast pastry, festive cinnamon rolls, how to make red velvet cinnamon rolls from scratch, best cream cheese frosting for cinnamon rolls, easy red velvet cinnamon rolls with yeast, Valentine’s Day red velvet rolls, red velvet cinnamon rolls with chocolate chips, homemade cinnamon rolls with red velvet dough, fluffy red velvet rolls with cream cheese glaze, natural red food coloring in baking, red velvet brunch pastry idea, red velvet sweet rolls for dessert
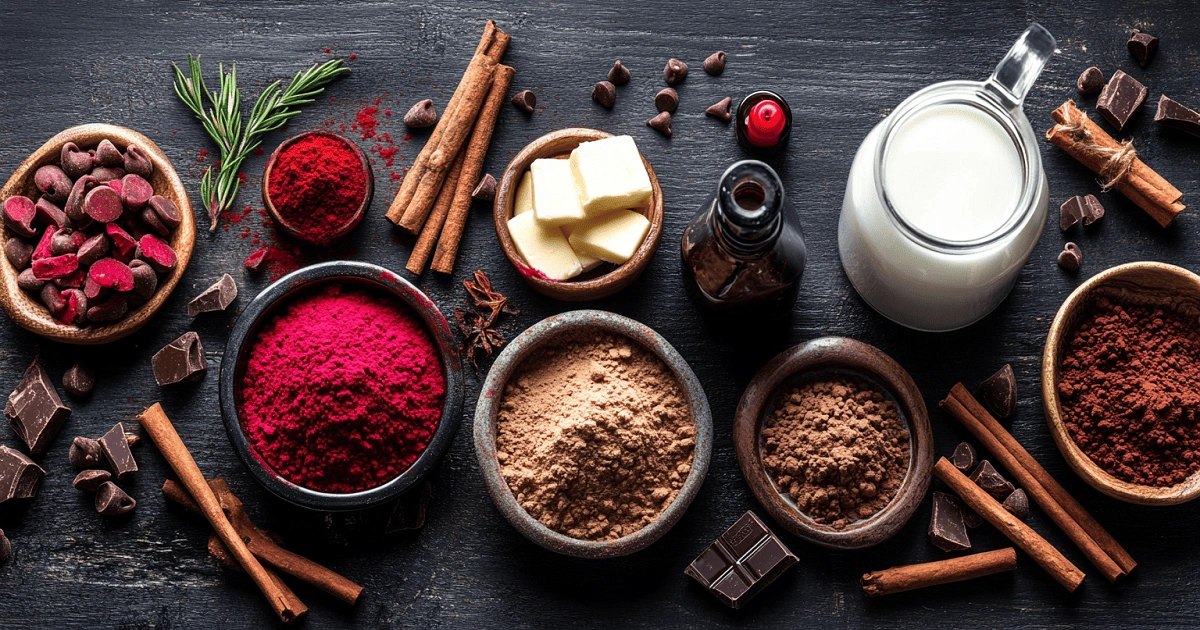
Key Ingredients That Make Red Velvet Cinnamon Rolls Unique
Cocoa, Milk, and Vanilla: The Red Velvet Foundation
Red Velvet Cinnamon Rolls get their rich flavor from a simple but smart combo cocoa powder, warm milk, and vanilla extract. The cocoa adds just a hint of chocolate, while milk softens the dough for that signature velvet texture. A splash of vanilla rounds it all out with smooth sweetness.
To achieve that vibrant red color, most recipes call for red food coloring, but natural alternatives like beet powder can work too. The key is balancing flavor with visual appeal and these ingredients do exactly that.
The Irresistible Filling
What sets these rolls apart isn’t just the red dough it’s the brown sugar and cinnamon swirl inside. Melted butter helps the sugar seep into every layer as it bakes, creating that gooey center everyone loves.
Want an upgrade? Toss in mini chocolate chips. They melt into the swirl and make each bite even richer just one of the reasons these rolls are next-level.
Check out Brownie Bread – The Best 9-Step Fudgy Recipe You Must Try for another sweet idea that hits the same cozy vibe.
How to Make Red Velvet Cinnamon Rolls Step-by-Step
Prepping the Dough: Build the Perfect Base
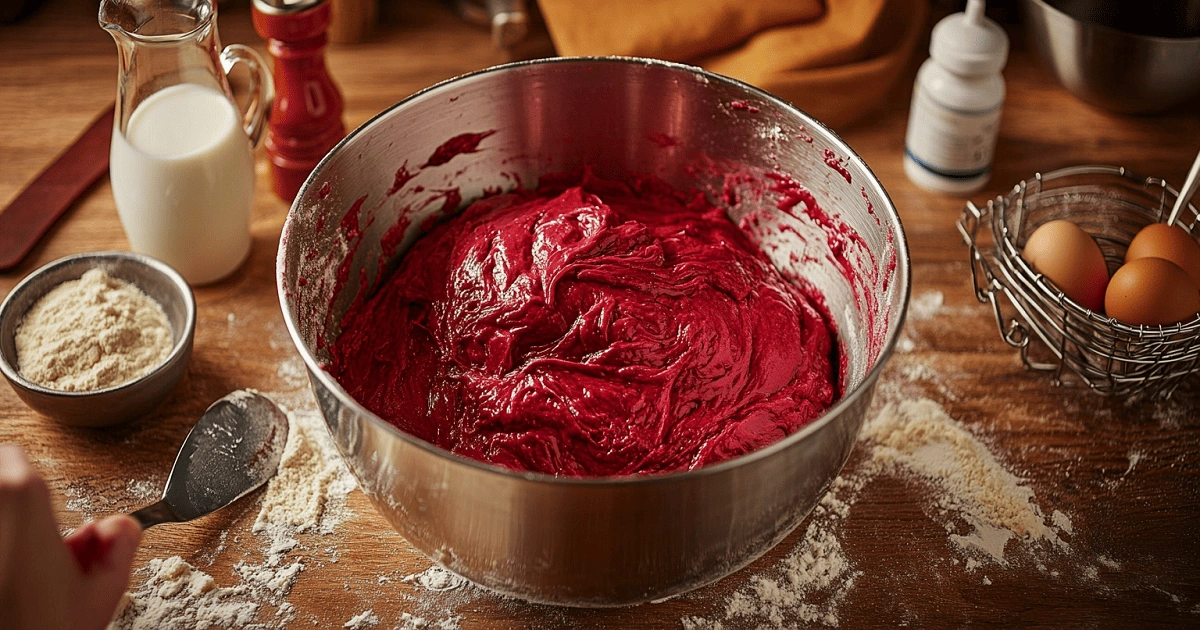
Making Red Velvet Cinnamon Rolls from scratch starts with building a rich, pillowy dough. In a large bowl, whisk together 2 cups of all-purpose flour, granulated sugar, active dry yeast, baking powder, and salt this forms your dry base. Separately, mix warmed whole milk, melted butter, an egg, vanilla extract, and red food coloring. Combine the two, stirring well until you have a sticky dough.
Gradually add the rest of the flour until a soft dough forms. Once combined, transfer to a floured surface and knead for 5–7 minutes until smooth and elastic. The goal is a supple dough that’s firm enough to hold shape but soft enough to stay tender after baking.
Place the kneaded dough into a greased bowl, cover it, and let it rise in a warm spot for about 1 hour, or until doubled in size. This first rise is what gives the rolls their airy, bakery-style texture.
Filling, Rolling, and Baking to Perfection
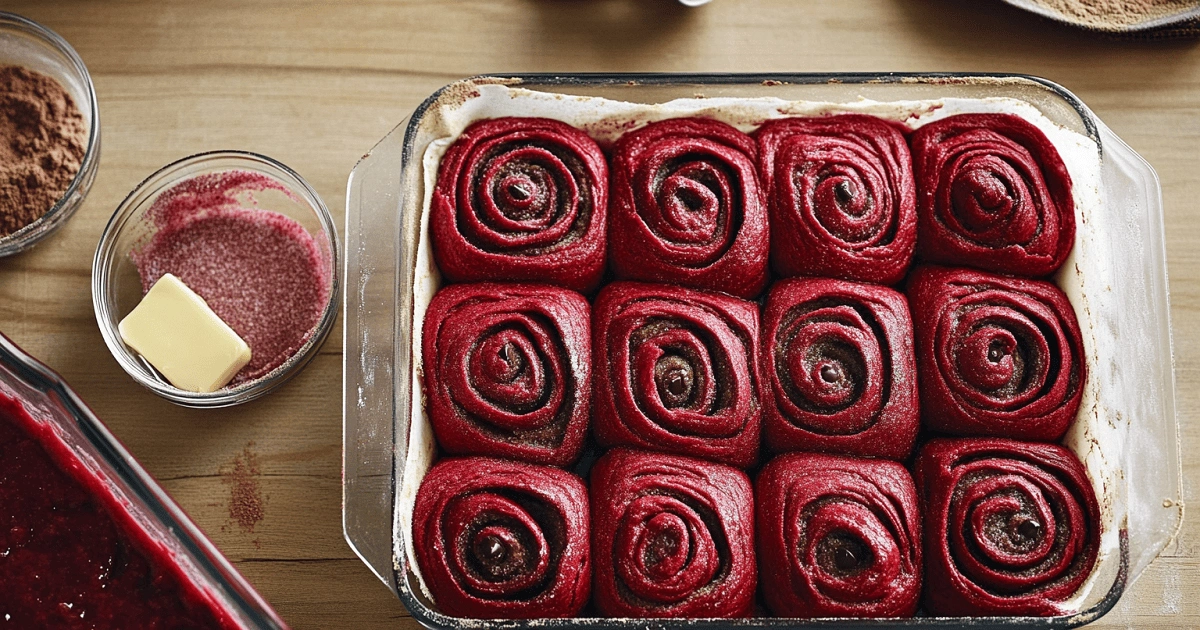
After the dough has risen, roll it out on a floured surface into a 12×18-inch rectangle. For the filling, mix together softened butter, packed brown sugar, and ground cinnamon. Spread this mixture generously over the rolled dough, edge to edge. If you’re using mini chocolate chips, now’s the time to sprinkle them in for melty, chocolatey pockets.
Starting from the long edge, roll the dough into a tight log. Slice it into 12 even pieces and place them into a greased 9×13-inch baking dish. Cover the dish and let the rolls rise again for about 30 minutes this second rise ensures a fluffy texture.
Preheat your oven to 350°F (175°C) and bake the rolls for 25–30 minutes, or until golden on top and set in the center. The aroma alone will be irresistible.
Once baked, let them cool slightly just enough so the frosting doesn’t melt completely.
Don’t miss our Cake Mix Red Velvet Cheesecake Brownies for another delicious twist on classic red velvet flavor.
Secrets to Soft & Fluffy Texture
Kneading and Rising Tips
For extra-soft Red Velvet Cinnamon Rolls, knead the dough for 5–7 minutes until smooth and slightly tacky. Avoid adding too much flour just enough to prevent sticking.
Let the dough rise for 1 hour in a warm, draft-free place until doubled in size. This step is key for light, airy rolls.
Baking for the Perfect Finish
Bake at 350°F (175°C) for 25–30 minutes until golden and set in the center. Don’t overbake too long in the oven will dry them out. Brush with melted butter after baking for extra softness.
Let the rolls cool for 10 minutes before frosting so the glaze spreads smoothly without melting off.
The Cream Cheese Frosting That Changes Everything
How to Make a Smooth and Rich Cream Cheese Glaze
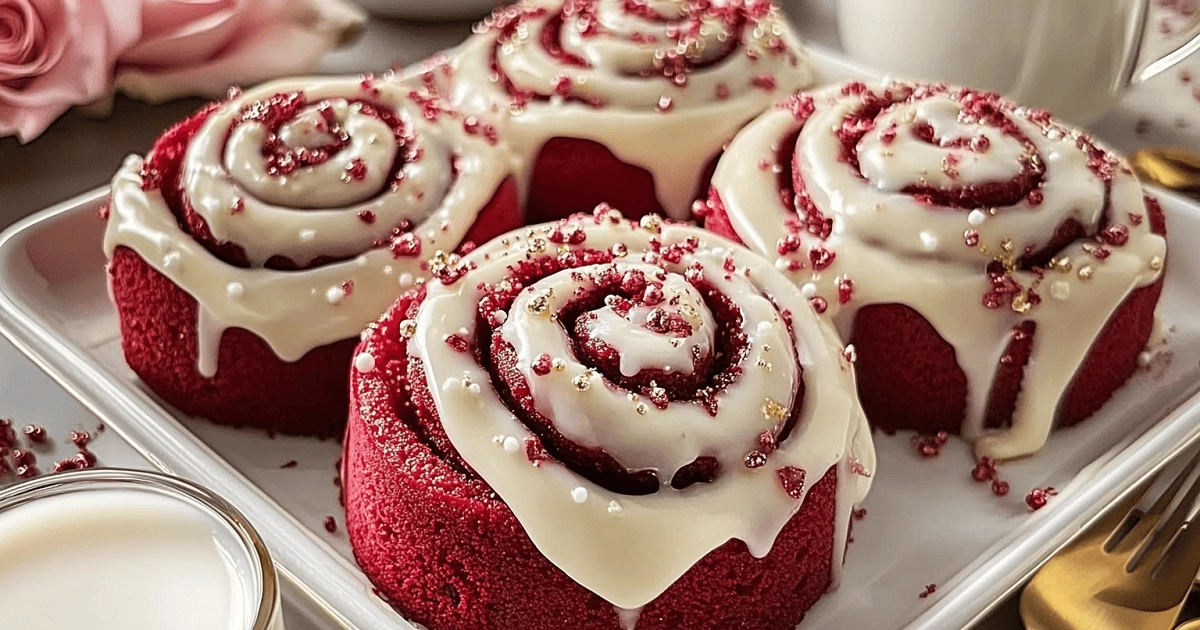
No Red Velvet Cinnamon Rolls are complete without that luscious cream cheese frosting melting over the top. It’s the final touch that takes these rolls from good to unforgettable.
Start by beating together softened cream cheese and unsalted butter until light and creamy. Gradually add powdered sugar, followed by a splash of vanilla extract and a few tablespoons of milk. Mix until smooth and fluffy, adjusting milk to get your desired consistency thick enough to stay put, soft enough to spread easily.
The tang of cream cheese cuts through the sweetness of the rolls, perfectly balancing the rich red velvet and warm cinnamon flavors. It’s more than frosting it’s part of the experience.

Flavor Variations: Make It Your Own
Want to level up the glaze? Try one of these simple twists:
-
Lemon zest: Adds a bright, citrus kick that contrasts the richness.
-
Maple syrup: Swirl in a spoonful for a cozy, fall-inspired flavor.
-
White chocolate: Melt and mix in for a sweet, creamy upgrade.
No matter how you tweak it, always frost the rolls while they’re still slightly warm. This allows the frosting to gently melt into the swirls without sliding off completely.
Flavor Enhancements and Substitutions
Natural Red Coloring Options
While most Red Velvet Cinnamon Rolls use traditional red food coloring, there are cleaner, natural alternatives that deliver bold color and subtle earthy flavors. Popular options include beet powder, hibiscus powder, or pomegranate juice concentrate all of which create rich red tones without artificial dyes.
If you’re new to natural dyes, King Arthur Baking’s guide on how to make natural food coloring is a fantastic starting point. They explain how to extract vibrant, bake-safe colors from fruits, veggies, and spices.
Making It Dairy-Free or Vegan-Friendly
Want to adapt this recipe for a dairy-free or vegan diet? It’s easier than you think.
Dough swaps:
-
Use plant-based milk like almond or oat milk.
-
Replace butter with vegan margarine or coconut oil.
-
Replace the egg with a flaxseed egg by mixing 1 tablespoon of ground flaxseed with 3 tablespoons of water. Let it sit for a few minutes to thicken before using.
Frosting swaps:
-
Go for dairy-free cream cheese and vegan butter.
-
Use powdered sugar and a splash of non-dairy milk for a creamy glaze.
The result? Soft, flavorful cinnamon rolls with all the red velvet charm no animal products required.
Check out Roasted Carrot Lettuce Wraps – 5 Reasons You’ll Love Them for a light, veggie-packed alternative to pair with dessert.
Occasions to Serve Red Velvet Cinnamon Rolls
Perfect for Brunch, Valentine’s Day & Special Mornings
Red Velvet Cinnamon Rolls aren’t just delicious they’re stunning on the plate. Their bold color and rich flavor make them ideal for special occasions. Planning a brunch? These rolls are the perfect centerpiece. Celebrating Valentine’s Day or an anniversary? Their red hue and decadent taste are pure romance on a plate.
They’re also great for Mother’s Day, birthdays, baby showers, or any cozy weekend when you want to wow family and friends without a complicated recipe.
Dress Them Up for Parties & Holidays
Want to go festive? Add sprinkles, white chocolate drizzle, or even edible glitter for extra flair. You can also slice them smaller to create mini rolls for a party platter. They’re easy to make ahead and reheat just before serving no last-minute stress.
And let’s be honest: they look like something from a bakery window. Serve them warm with coffee, tea, or a glass of milk and watch them disappear.
Looking for more crowd-pleasers? Don’t miss our Brownie Bread – The Best 9-Step Fudgy Recipe You Must Try for another showstopper that guests will love.
Storage, Freezing, and Reheating Tips
Keeping Red Velvet Cinnamon Rolls Fresh
Once baked, Red Velvet Cinnamon Rolls stay soft and moist for up to 3 days at room temperature—just cover tightly with foil or plastic wrap. For longer freshness, store them in an airtight container in the fridge for up to 5 days.
To keep that fluffy texture, avoid storing them uncovered. Dry air is the enemy of soft cinnamon rolls.
Freezer-Friendly and Easy to Reheat
Want to make them ahead? You can freeze unbaked rolls after shaping and placing them in a greased pan. Just wrap the pan well and freeze for up to 2 months. When ready to bake, thaw overnight in the fridge and let rise for about 45 minutes at room temp before baking as usual.
Already baked them? Let them cool completely, then freeze the rolls (unfrosted) in a zip-top bag. To reheat, microwave for 30–40 seconds or warm in the oven at 325°F (160°C) for 10 minutes.
Tip: Add frosting after reheating to keep it smooth and glossy.
Common Mistakes to Avoid
Over-Kneading or Under-Kneading the Dough
One of the most common mistakes when making Red Velvet Cinnamon Rolls is improper kneading. Over-kneading can make the dough tough and chewy, while under-kneading often results in dense, flat rolls. The goal is to knead just enough 5 to 7 minutes until the dough becomes smooth and elastic.
If your dough tears easily or feels tight, it’s probably overworked. On the other hand, if it’s still sticky and slack, give it a few more turns on a floured surface or let it rest before continuing. For fluffy, bakery-style Red Velvet Cinnamon Rolls, this step is critical.
Not Letting the Dough Rise Properly
Rushing or skipping the rise is a surefire way to ruin your rolls. Without proper fermentation, the dough won’t get that soft, pillowy texture we expect from Red Velvet Cinnamon Rolls. Let it rise until it doubles in size, even if it takes longer depending on your kitchen’s temperature.
Don’t forget the second rise after shaping the rolls. This is what gives them height, structure, and that satisfying spiral once baked. If the second rise is rushed, expect flat, gummy results not the showstopper you’re aiming for.
Frosting Too Early or Too Late
Timing is everything when it comes to frosting. Spread the cream cheese glaze too soon, and it melts right off. Wait too long, and it doesn’t blend or spread well. For best results, apply the frosting 10–15 minutes after baking, when the rolls are still warm but not hot.
This window allows the frosting to melt slightly into the swirls while keeping its silky texture and bold visual appeal.
Don’t miss our Fudgy Red Velvet Brownies – 7 Proven Tips for Gooey Perfection for more ways to avoid common baking pitfalls with red velvet treats.
FAQs About Red Velvet Cinnamon Rolls
What is the difference between red velvet cake and normal cake?
The key difference lies in flavor, texture, and ingredients. Red velvet cake uses cocoa powder, buttermilk, and sometimes vinegar, giving it a subtle chocolate flavor and a soft, tangy crumb. Normal cake like vanilla or yellow cake lacks the cocoa and typically has a simpler flavor without that tangy richness. The red hue is also a signature of red velvet, often enhanced with food coloring or natural alternatives.
How to get red velvet flavor?
To capture that authentic red velvet flavor, combine unsweetened cocoa powder, vanilla extract, and an acidic element like buttermilk or vinegar. These ingredients create the distinct balance of sweet, tangy, and chocolaty that defines red velvet. Add red food coloring or beet powder to complete the experience visually.
What is up with red velvet cake?
Red velvet has become a cultural icon in the dessert world. What’s up with it? It’s the blend of taste, texture, and nostalgia. People love its soft, almost melt-in-your-mouth crumb, that mild chocolate essence, and of course the bold red color. It feels special, even if it’s simple. That’s why it works so well in creative spinoffs like Red Velvet Cinnamon Rolls.
What makes red velvet cake red without food coloring?
Natural coloring options include:
-
Beetroot powder
-
Pomegranate juice concentrate
-
Hibiscus or raspberry powder
These ingredients provide vibrant red tones when combined with acidic ingredients (like buttermilk or vinegar) and cocoa powder, mimicking the traditional red velvet look no artificial dye required.
Conclusion
Conclusion
Red Velvet Cinnamon Rolls are the ultimate dessert fusion—bringing together the nostalgic richness of red velvet cake and the gooey warmth of classic cinnamon rolls. With the perfect balance of cocoa, cinnamon, and cream cheese frosting, they’re as flavorful as they are eye-catching.
These decadent Red Velvet Cinnamon Rolls are surprisingly easy to make at home. Just follow a few mindful tips: knead the dough properly, give it time to rise, and don’t hold back on that luscious cream cheese glaze. Whether you’re baking for brunch, holidays, or a cozy weekend treat, these rolls deliver unforgettable flavor, texture, and visual appeal.
Want to level up your baking game?
Check out Brownie Bread – The Best 9-Step Fudgy Recipe You Must Try for another showstopper your guests will love.