

Cake Mix Red Velvet Cheesecake Brownies – The Ultimate Decadent Dessert Made Easy
Cake Mix Red Velvet Cheesecake Brownies rich, creamy, and incredibly easy to make, are the kind of dessert that stops people in their tracks. Whether you’re prepping for a holiday, potluck, or just a cozy Friday night treat, these vibrant, fudgy brownies bring bakery-level indulgence to your kitchen using nothing more than a box of cake mix and a swirl of creamy cheesecake. In this guide, we’ll walk you through the best methods, top tips, and genius shortcuts to make this irresistible dessert right the first time.
Want even more decadent dessert ideas? Check out this delicious twist: Fudgy Red Velvet Brownies
Introduction to Cake Mix Red Velvet Cheesecake Brownies
What Makes Red Velvet Cheesecake Brownies So Irresistible
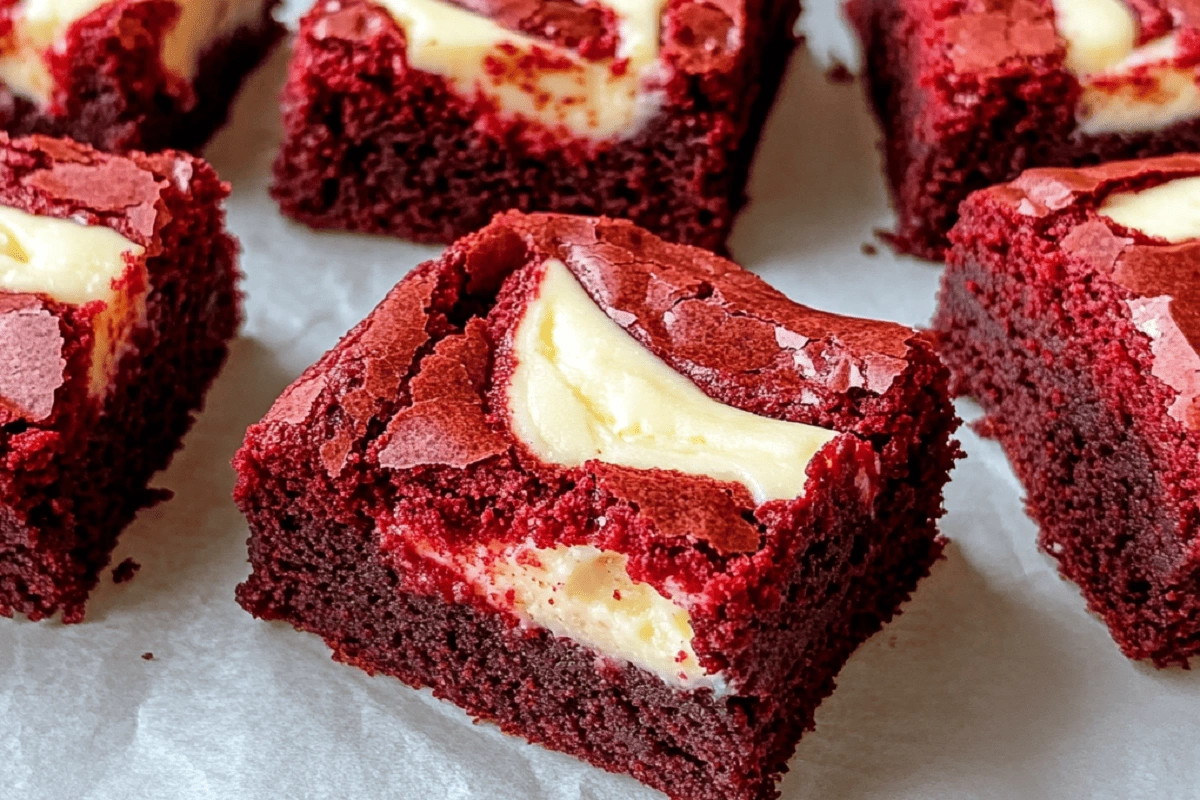
There’s something special about Cake Mix Red Velvet Cheesecake Brownies. It’s not just the deep cocoa flavor or the creamy swirl it’s the way the textures and colors come together in every bite. These brownies combine the vibrant red hue of red velvet with the tangy richness of cheesecake to deliver a dessert that looks just as good as it tastes.
You get a soft, cake-like base with just the right amount of chewiness, topped with a luscious cream cheese swirl that cuts through the sweetness beautifully. They’re a match made in dessert heaven.
Red velvet cheesecake brownies made with cake mix are also a time-saving miracle. You don’t have to be a pastry chef to pull off something that looks this impressive.
How Cake Mix Changes the Game in Dessert Baking
The biggest reason to fall in love with Cake Mix Red Velvet Cheesecake Brownies? Simplicity.
Cake mix takes the guesswork out of baking. No need to worry about cocoa-to-flour ratios or measuring out baking soda. The mix does the heavy lifting for you. All you need are a few kitchen staples like oil, eggs, and cream cheese to whip up a dessert that tastes completely homemade.
These brownies are ideal for beginner bakers or anyone looking for a shortcut to flavor without sacrificing quality. And because the base is already prepped for optimal texture, all you have to focus on is getting that creamy swirl just right.
Discover great ideas like this one: White Chocolate Raspberry Dream Cake

Cake Mix Red Velvet Cheesecake Brownies – The Best Easy Dessert (2025)
- Author: Joriel
- Total Time: 50 minutes (Note: You can optionally add 1–2 hours for cooling/chilling in instructions but keep “Total Time” based on active time.)
- Yield: 12 brownies (Cut into 9 large or 12 medium pieces depending on preference.)
- Diet: Vegetarian
Description
Fudgy red velvet brownies meet creamy cheesecake in this easy, crowd-pleasing dessert! Made with boxed cake mix and a swirl of rich cheesecake filling, these indulgent bars are as simple as they are irresistible.
Ingredients
For the Brownie Base:
• 1 (15 oz) box red velvet cake mix
• ⅔ cup vegetable oil
• 2 large eggs
For the Cheesecake Swirl:
• 8 oz cream cheese, softened
• ¼ cup granulated sugar
• 1 large egg
• 1 tsp vanilla extract
Instructions
1️⃣ Prepare the Brownie Batter:
• In a large bowl, mix cake mix, oil, and 2 eggs until combined.
• Do not overmix. Set aside.
2️⃣ Make the Cheesecake Layer:
• In another bowl, beat softened cream cheese, sugar, 1 egg, and vanilla using a hand mixer until smooth and creamy.
3️⃣ Layer the Brownies:
• Preheat oven to 350°F (175°C).
• Spray an 8×8-inch pan with nonstick spray and line with parchment paper for easy removal.
• Press ⅔ of the red velvet mixture evenly into the bottom of the pan.
• Pour the cheesecake mixture over the top and spread gently.
• Crumble or dollop the remaining red velvet batter over the cheesecake layer.
4️⃣ Bake & Cool:
• Bake for 40–45 minutes or until a toothpick inserted in the center comes out mostly clean.
• Let cool completely in the pan before slicing into squares. Chill for 1 hour for neater cuts.
Notes
Brownie Texture Tip: For a chewy, fudgy result, don’t overmix the red velvet batter. Mix just until combined after adding oil and eggs.
Swirl Strategy: To achieve a beautiful marbled look, spoon the cheesecake and remaining batter gently and swirl with a butter knife or skewer in figure-eight motions.
Cheesecake Consistency: Make sure your cream cheese is room temperature before mixing to avoid lumps and achieve a smooth swirl. Overmixing the cheesecake batter can introduce air bubbles and cause cracking.
Make-Ahead Friendly: These brownies can be made 1–2 days ahead. Store in an airtight container in the fridge. The flavors deepen over time, making them even more delicious.
Freezing Instructions: Once completely cooled and sliced, wrap brownies individually in plastic wrap and store in a freezer-safe container. Thaw in the fridge overnight or at room temp for 45 minutes before serving.
Add-Ins You’ll Love: Fold white chocolate chips, chopped pecans, or mini marshmallows into the red velvet batter before baking for texture and variety.
Occasion-Ready Presentation: Use cookie cutters to shape brownies into hearts, stars, or festive symbols for holidays and events. Dust with powdered sugar or drizzle with chocolate for an elegant finish.
Pan Tips: For best results, bake in a metal 8×8 or 9×9-inch pan lined with parchment paper. Avoid glass pans they retain heat and may cause overbaking.
- Prep Time: 10 minutes
- Cook Time: 50 minutes
- Category: Dessert
- Method: Baking
- Cuisine: American
Nutrition
- Serving Size: 1 brownie (approx. 2.5 x 2.5 inches)
- Calories: 260 kcal
- Sugar: 20 g
- Sodium: 180 mg
- Fat: 14 g
- Saturated Fat: 6 g
- Unsaturated Fat: 7 g
- Trans Fat: 0 g
- Carbohydrates: 29 g
- Fiber: 1 g
- Protein: 3 g
- Cholesterol: 40 mg
Keywords: cake mix brownies, red velvet brownies, cheesecake brownies, red velvet dessert, easy brownies recipe, cream cheese swirl brownies, boxed cake mix dessert, swirl brownies, holiday brownie bars, red velvet cake mix recipe, cheesecake bar recipe, brownie cheesecake swirl, valentine’s day dessert, red velvet squares, layered brownies
Choosing the Right Cake Mix for Red Velvet Cheesecake Brownies
Best Brands of Red Velvet Cake Mix for Cheesecake Brownies
Your Cake Mix Red Velvet Cheesecake Brownies are only as good as the mix you start with. Not every boxed mix delivers the same texture or flavor, and for this recipe, the right balance is key. You want a mix that yields a dense, moist base not one that’s too fluffy or dry.
Here are some of the top-performing cake mixes for red velvet cheesecake brownies:
| Brand | Why It Works | Flavor Profile |
|---|---|---|
| Duncan Hines Signature Red Velvet | Moist, rich, ideal for swirling | Balanced cocoa + buttery vanilla |
| Betty Crocker Super Moist Red Velvet | Reliable texture, simple to prepare | Slightly sweeter, creamy |
| Pillsbury Moist Supreme Red Velvet | Affordable and reliable | Mild cocoa, deep red color |
| Ghirardelli Red Velvet Premium | Gourmet taste, fewer preservatives | Rich cocoa, natural tang |
Tip: For the best red velvet cheesecake brownies, pick a mix labeled “moist” or “dense.” These help your layers hold up during baking and create that ideal chewy-meets-creamy consistency.
Don’t miss our cheesecake tips here: Perfect Blackberry Cheesecake Recipe
Ingredients to Look for in a Quality Cake Mix
If you want your Cake Mix Red Velvet Cheesecake Brownies to stand out, don’t just grab any box on the shelf. Look at the ingredients on the label.
Here’s what to aim for in a red velvet cake mix:
-
Buttermilk powder or milk solids for that signature red velvet tang.
-
Use natural cocoa for a classic chocolate taste or Dutch-processed cocoa to achieve a richer, more intense chocolate flavor.
-
No artificial dyes (some premium brands use beet juice or natural colorants).
-
Free from high fructose corn syrup to maintain a more natural, authentic sweetness.
You’ll get a richer flavor and better texture by choosing a high-quality base. Plus, it gives your brownies a better chance of holding that beautiful cheesecake swirl.
Looking for inspiration? Try this no-bake treat: Philadelphia No-Bake Cheesecake Recipe
Making the Cheesecake Layer Perfect for your Cake Mix Red Velvet Cheesecake Brownies
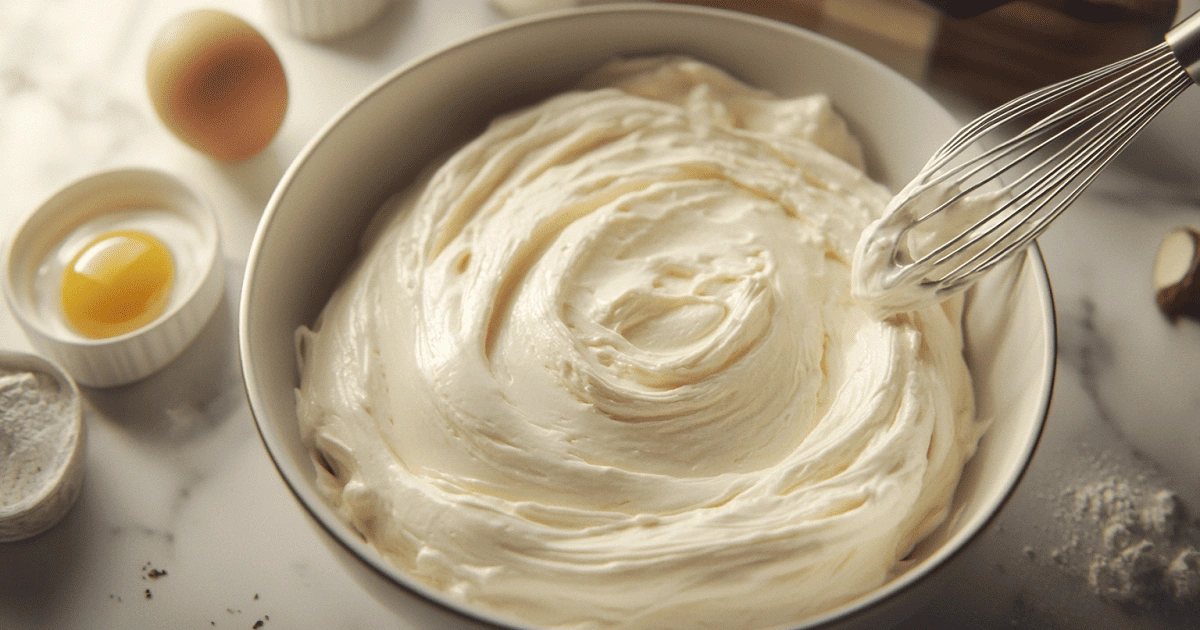
How to Make Creamy, Tangy Cheesecake Filling
To make Cake Mix Red Velvet Cheesecake Brownies truly unforgettable, the cheesecake layer has to be smooth, tangy, and just the right amount of sweet. This creamy swirl isn’t just decorative it balances the richness of the red velvet base and adds that signature indulgent bite.
Here’s what you’ll need:
-
8 oz full-fat cream cheese, softened
-
1 large egg
-
1/4 cup white sugar
-
1/2 teaspoon vanilla extract
-
A pinch of salt (optional)
Preparation tips:
Use room-temperature cream cheese and egg to prevent lumps. Start by beating the cream cheese until it’s completely smooth, then blend in the sugar, vanilla, and egg just until everything is fully incorporated avoid overmixing. Over-beating can incorporate too much air, leading to cracks.
The cheesecake mixture should have a thick but pourable consistency perfect for spooning and swirling over the red velvet layer.
Pro tip: If you like a little tang, try replacing 2 tablespoons of cream cheese with sour cream or Greek yogurt. It boosts the flavor while keeping the brownies moist and tender.

Ingredients and Techniques to Prevent Cracks or Dryness
Cracks or dryness in the cheesecake layer can ruin the texture of your Cake Mix Red Velvet Cheesecake Brownies. Fortunately, just a few easy tweaks can make a big impact.
| Issue | Cause | Fix |
|---|---|---|
| Cracking | Overbaking or dry heat | Bake at a steady 325°F and avoid opening the oven door |
| Gritty texture | Cold cream cheese or over-mixing | Always use softened ingredients and mix until just combined |
| Dry edges | Uneven heat or thin layers | Use parchment paper and bake in the center of the oven |
Also, avoid whipping the batter at high speed. Gentle folding maintains structure and prevents bubbles, which can cause uneven texture after baking.
Texture tip: The cheesecake swirl should stay creamy, not rubbery. If the batter looks too thick, add 1 tablespoon of milk to loosen it but don’t overdo it or it will spread too much when baked.
The cheesecake in these brownies should bake just enough to set but still jiggle slightly in the center when you take them out. That ensures it finishes setting as it cools, resulting in that soft, rich finish that defines the best cake mix red velvet cheesecake brownies.
Assembling the Layers Like a Pro
Step-by-Step Guide to Layering Brownie and Cheesecake Mixture
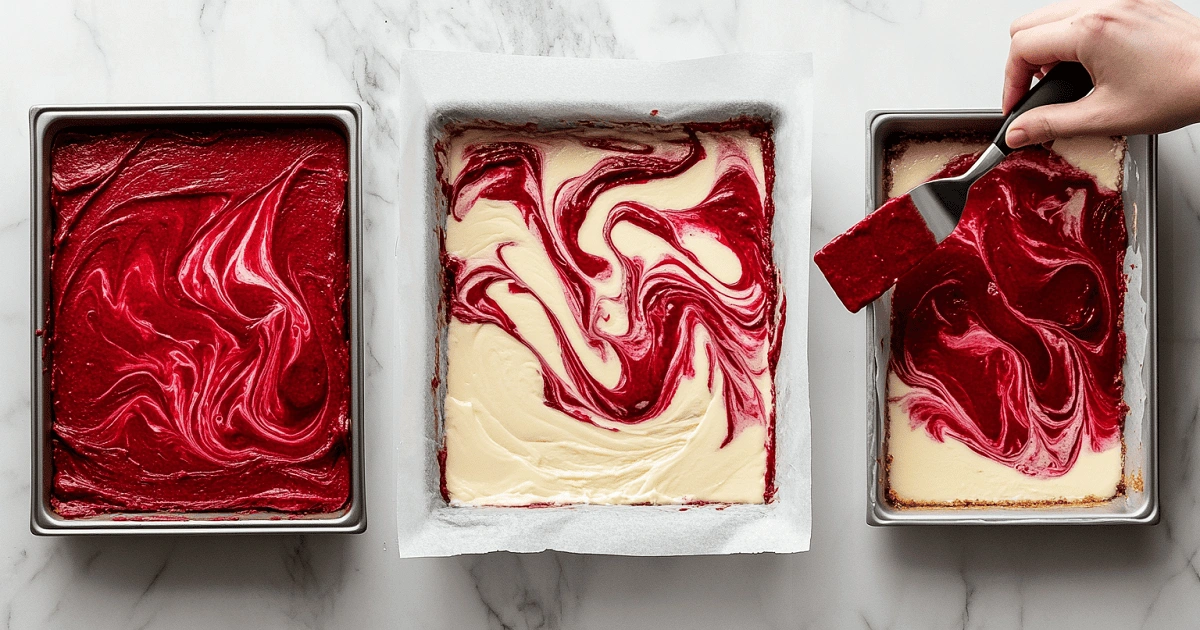
When it comes to Cake Mix Red Velvet Cheesecake Brownies, success is all about the layering. Done right, the contrast between the deep red base and the creamy swirl creates a stunning dessert that looks as good as it tastes.
Step 1 – Prepare the Brownie Layer:
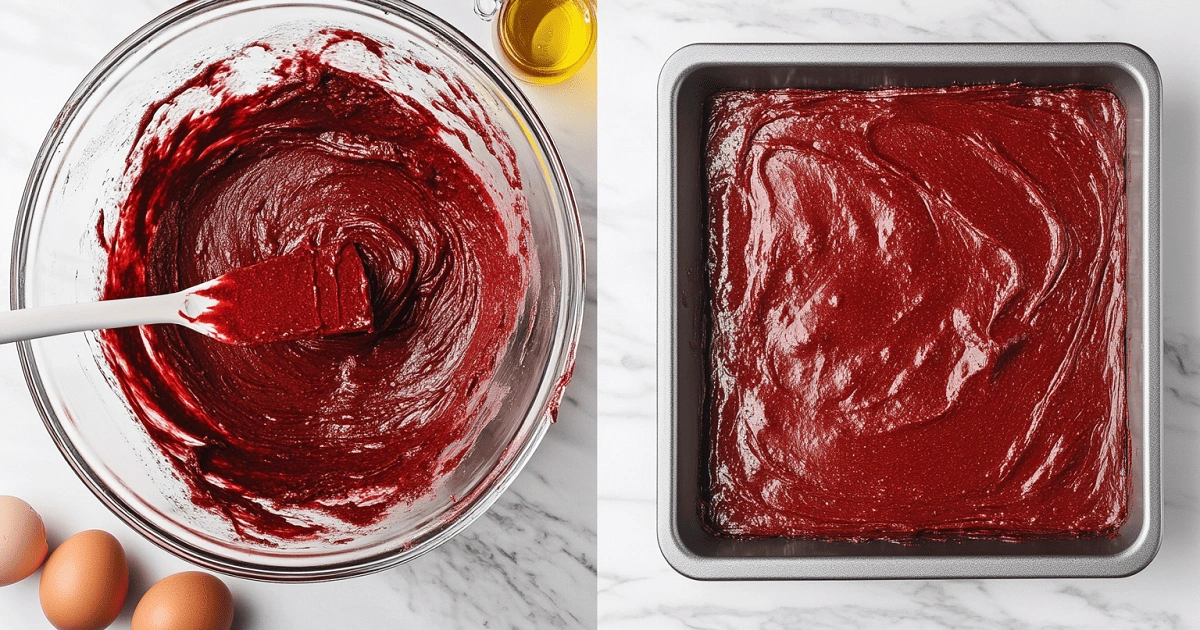
In a large mixing bowl, combine your red velvet cake mix with 2 eggs and 1/2 cup of vegetable oil. Mix until the batter is thick and resembles classic brownie consistency. This mixture will be denser than standard cake batter that’s exactly what you want for a chewy texture.
Step 2 – Spread the Base:
Lightly grease or line a 9×9-inch or 8×8-inch pan with parchment paper, leaving extra paper over the edges for effortless removal. Spread about 3/4 of the red velvet batter evenly into the bottom of the pan. Use a spatula or lightly greased fingers to push it into corners.
Step 3 – Add the Cheesecake Layer:
Carefully pour the cheesecake mixture (from Part 3) over the red velvet base, spreading it gently for even coverage. Smooth it out evenly using the back of a spoon or an offset spatula.
Step 4 – Top with Remaining Batter:
Spoon dollops of the leftover red velvet batter over the cheesecake layer. These dollops will create the swirls in the next step.
Step 5 – Time to Swirl:
Use a butter knife or skewer to gently swirl the red velvet and cheesecake layers together. Be careful not to overdo it 5–7 strokes in an “S” or figure-eight motion is enough to achieve a marbled effect without mixing the layers completely.
This layering process is key to achieving that signature Cake Mix Red Velvet Cheesecake Brownies look and texture.
Check out more swirl inspiration here: Cinnamon Roll Cheesecake Recipe
The Best Pan Size, Lining Techniques, and Baking Prep
Choosing the right pan and lining it properly ensures even baking and beautiful, clean-cut brownie squares.
Pan Size:
An 8×8 or 9×9-inch square metal baking pan is ideal for even heat distribution and perfect thickness. Avoid glass pans they retain heat too long, which can dry out the cheesecake layer.
Parchment Paper Lining:
Line the baking pan with parchment paper, ensuring a 1-inch overhang on all sides for easy lifting. This not only prevents sticking but also allows you to lift the brownies out cleanly for slicing.
Greasing Tips:
Even with parchment, a light spray of baking spray ensures the batter spreads easily and doesn’t pull during swirling.
Baking Prep Checklist:
-
Preheat your oven to 325°F
-
Position rack in center
-
Tap pan gently on counter after swirling to remove air pockets
-
Avoid filling the pan to the brim leave about 1/4 inch of space at the top to prevent overflow.
Layering is more than just a step it’s the heart of Cake Mix Red Velvet Cheesecake Brownies. When done properly, it creates not only the ideal texture but also the irresistible, bakery-style look that gets rave reviews.
Swirling Techniques for Beautiful Cake Mix Red Velvet Cheesecake Brownies
Easy Methods for Cheesecake Swirls
Swirling is the visual magic of Cake Mix Red Velvet Cheesecake Brownies—it transforms them from “homemade” to “professional bakery-level” with just a few strokes of a knife. But if you overdo it or use the wrong technique, you’ll end up with a muddled mess instead of a beautiful marbled effect.
Here’s how to get perfect swirls every time:
1. Use a Butter Knife or Wooden Skewer:
Avoid sharp or wide tools. A thin butter knife, skewer, or even a chopstick gives you control without dragging too much batter. Need help visualizing the swirl? This step-by-step guide on how to swirl brownies explains the process beautifully with clear visuals.
2. Drop Strategically:
After you’ve spread your cheesecake layer on top of the base, spoon the remaining red velvet batter in small dollops across the surface. Think checkerboard spacing.
3. Swirl Gently:
Insert the knife just deep enough to reach the cheesecake layer. Use a figure-eight or S-shaped motion to create fluid, natural patterns. Work from edge to edge but don’t swirl too many times 5 to 6 strokes are plenty.
4. Clean Between Swirls:
To achieve clean, defined swirls, wipe your knife between each pass this helps keep the layers crisp and the top looking tidy.
5. Tap the Pan After Swirling:
Lightly tap your baking pan on the counter to release any trapped air bubbles. This allows the batter to level out naturally while preserving the swirl pattern.
Want visual inspiration? Don’t miss our cheesecake pattern ideas in this article: Perfect Blackberry Cheesecake Recipe
Tools and Tricks to Create an Eye-Catching Marbled Effect
While a knife or skewer gets the job done, other tools and add-ons can level up your swirl game:
| Tool | Purpose | Pro Tip |
|---|---|---|
| Chopstick or skewer | Maximum precision | Ideal for small pans |
| Offset spatula | Smooth top before swirling | Helps even layers |
| Toothpick | Fine swirl lines | Great for delicate swirls |
| Gel food coloring (optional) | More dramatic contrast | Add to cheesecake for two-tone swirls |
Advanced swirl idea:
Divide your cheesecake mixture into two parts. Leave one plain and tint the other lightly pink with food coloring. Swirl both into the red velvet base for a triple-tone design that looks amazing on Valentine’s Day or birthdays.
Color tip: The vivid contrast between the red velvet cake and creamy white cheesecake layer is what makes Cake Mix Red Velvet Cheesecake Brownies visually stunning. Resist the urge to mix too much keep your colors clean and bold.
Learn more about smart dessert designs: Fudgy Red Velvet Brownies
Baking Tips for Fudgy, Moist Cake Mix Red Velvet Cheesecake Brownies
Recommended Oven Temperatures and Timings
Baking Cake Mix Red Velvet Cheesecake Brownies is where everything comes together. The right oven temperature and timing ensure your brownies are perfectly fudgy in the middle, with a set cheesecake top that’s not dry or cracked.
Here’s the golden rule:
Bake at 325°F (163°C). Lower than a traditional cake or brownie recipe, this temperature allows both the red velvet base and cheesecake layer to bake evenly without overbaking one or undercooking the other.
Baking Time:
-
8×8-inch pan: 38–42 minutes
-
9×9-inch pan: 35–40 minutes
-
Metal pans bake faster than glass check early!
To test doneness, insert a toothpick 2 inches from the edge it should come out with a few moist crumbs, not wet batter. The center may jiggle slightly due to the cheesecake, but it will firm up while cooling.
Oven tip: Preheat your oven fully and use the center rack to promote even heat flow. Avoid placing your pan too close to the top or bottom.
Learn more about achieving bakery-quality results: White Chocolate Raspberry Dream Cake
How to Avoid Undercooked or Overbaked Layers
Even experienced bakers can end up with gooey centers or dry edges. Here’s how to avoid common mistakes and bake flawless Cake Mix Red Velvet Cheesecake Brownies every time:
| Problem | Cause | Fix |
|---|---|---|
| Overbaked edges | Pan too large or oven too hot | Use the correct pan and line it properly |
| Gooey center | Cheesecake too thick or batter under-mixed | Spread layers evenly and follow mixing tips |
| Burnt top | Cheesecake exposed too long | Tent foil over the top in the last 10 minutes |
Extra Tips for Perfect Texture:
-
Don’t open the oven in the first 25 minutes heat loss can cause sinking.
-
Use a baking thermometer if needed; oven dials are often inaccurate.
-
Let the pan rest in the oven (with the door ajar) for 5 minutes after turning it off this helps avoid sudden temperature drops that crack cheesecake.
Moisture and fudginess are what make these brownies shine. That soft, chewy texture against the creamy cheesecake swirl is what separates Cake Mix Red Velvet Cheesecake Brownies from other box mix desserts.
Looking for more tips on moist texture in baked goods? Moist Chocolate Chip Muffins with Yogurt
Cooling, Cutting, and Storing the Brownies
How Long to Cool Before Cutting
After baking your Cake Mix Red Velvet Cheesecake Brownies, the most important step is often the hardest waiting. These brownies need to cool completely before slicing to achieve clean edges and preserve that layered look.
Here’s the best method for cooling:
-
Let it cool in the pan on a wire rack for about 1 hour.
-
Transfer the pan to the fridge and chill for another 1–2 hours.
-
Once fully chilled, use the parchment overhang to lift the brownies out of the pan.
Trying to slice while warm causes the cheesecake layer to smear and the brownie base to fall apart.Chilling allows the layers to set properly, making them easier to slice cleanly.
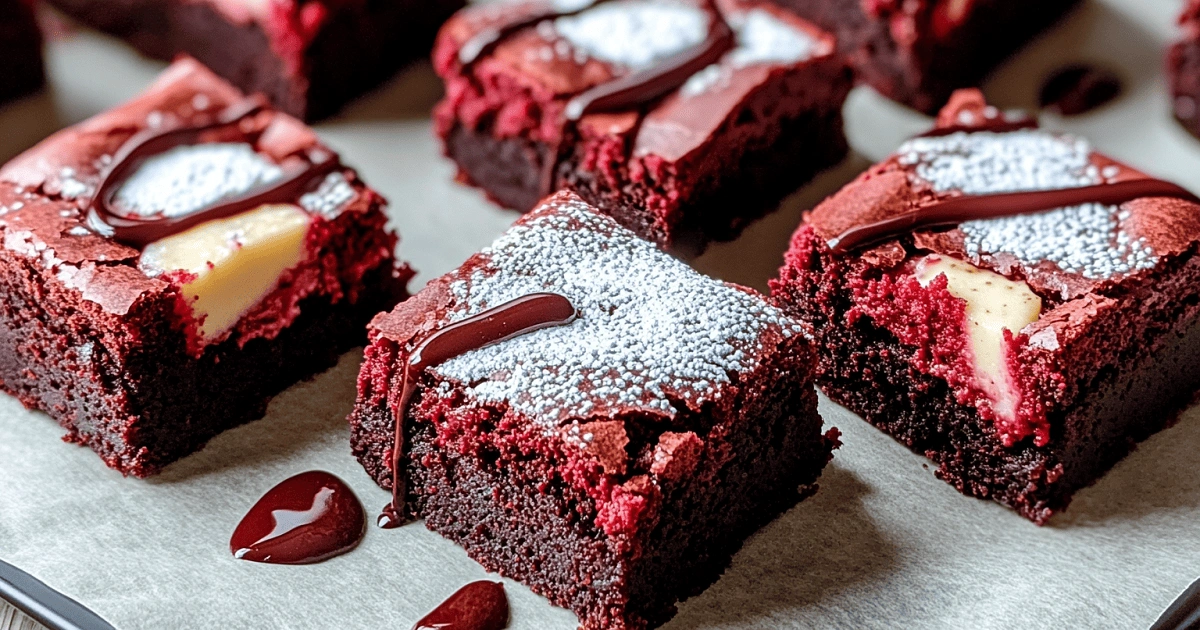
Pro Tip: For clean slices, dip your knife in hot water and wipe it off between each cut. This ensures sharp, smooth slices that showcase those gorgeous red velvet and cheesecake swirls.
Proper Storage for Fridge or Freezer to Keep Them Fresh
Storing your Cake Mix Red Velvet Cheesecake Brownies correctly will preserve both texture and flavor for days (or weeks) to come.
Refrigerator Storage:
-
Place brownies in an airtight container.
-
Separate layers with wax paper if stacking.
-
Refrigerate and enjoy within 5 days for the best taste and texture.
Because of the cream cheese layer, these brownies must be kept chilled. Leaving them at room temperature for long periods increases the risk of spoilage. For even more tips on keeping cream cheese fresh, this guide from Martha Stewart covers proper storage methods and shelf life.
Freezer Storage:
Want to make them ahead or save leftovers?
-
Cool and slice brownies first.
-
Wrap each piece in plastic wrap, then place in a freezer-safe zip-top bag or airtight container.
-
Store for up to 2 months.
To thaw, transfer to the fridge overnight or let sit at room temp for 30–45 minutes.
| Storage Method | Lifespan | Texture Tips |
|---|---|---|
| Refrigerated | 4–5 days | Keep in airtight container |
| Frozen | Up to 2 months | Wrap tightly to avoid freezer burn |
These brownies are ideal for make-ahead desserts and can be frozen in batches for holidays, events, or last-minute sweet cravings. Just thaw and enjoy they’ll still have that fudgy base and creamy cheesecake swirl you love from fresh-baked Cake Mix Red Velvet Cheesecake Brownies.
Looking for another fridge-friendly dessert? Philadelphia No-Bake Cheesecake Recipe
Creative Variations and Toppings to Try
Delicious Add-Ins for Extra Flavor
Want to level up your Cake Mix Red Velvet Cheesecake Brownies? Here are a few easy ways to add texture and flair:
-
White Chocolate Chips: Stir into the batter for creamy sweetness.
-
Chopped Nuts: Pecans or walnuts add crunch and pair perfectly with red velvet.
-
Chocolate Swirl: Drizzle melted chocolate or ganache over the top and swirl it in for an added touch of indulgence.
-
Coconut Flakes: A light sprinkle adds chew and a tropical note.
These additions are simple but make a big impact on flavor and texture.
Toppings & Serving Ideas for Every Occasion
These brownies look great on their own but a little extra can make them party-worthy.
-
Valentine’s Day: Cut into heart shapes, dust with powdered sugar.
-
Christmas: Drizzle with white and green chocolate.
-
Gifting: Wrap slices in parchment, add a cute label.
-
Dessert Plating: Serve chilled or slightly warm with ice cream and a raspberry drizzle.
Cake Mix Red Velvet Cheesecake Brownies are already eye-catching but these quick upgrades will make them unforgettable.

Discover more dessert ideas: No-Bake Cherry Cheesecake Recipe
PART 9: Common Questions Answered
Can I make red velvet brownies using cake mix?
Yes, and it’s one of the easiest ways to get consistent, delicious results. Using a boxed mix simplifies prep and delivers a moist, chewy texture that pairs perfectly with the cheesecake swirl in these brownies.
What kind of cake mix works best for red velvet cheesecake brownies?
Look for red velvet cake mixes labeled “moist” or “dense.” Brands like Duncan Hines and Betty Crocker are reliable options for making Cake Mix Red Velvet Cheesecake Brownies with a soft, sturdy base.
How do I swirl the cheesecake into the brownies?
Once the cheesecake layer is spread evenly, add spoonfuls of the reserved red velvet batter on top. Use a knife or skewer to gently swirl through the two layers in S or figure-eight patterns. Don’t overmix.
Do I need to refrigerate red velvet cheesecake brownies?
Absolutely! Because of the cream cheese layer, these brownies should be kept in an airtight container in the fridge. They’ll maintain their flavor and texture for up to 5 days when properly stored.
Can I freeze these brownies?
Absolutely. Once fully cooled, slice and wrap each brownie in plastic wrap, then store in a freezer-safe container for up to 2 months. Thaw in the fridge overnight or on the counter before serving.
Looking for tips on cheesecake texture and storage? Perfect Blackberry Cheesecake Recipe
Conclusion: Why Cake Mix Red Velvet Cheesecake Brownies Deserve a Spot in Your Recipe Box
If you’re looking for a dessert that’s impressive, delicious, and surprisingly simple to make, Cake Mix Red Velvet Cheesecake Brownies are the answer. The deep red cocoa base paired with tangy cheesecake swirls creates a show-stopping treat that’s perfect for any occasion.
From choosing the right mix to swirling like a pro and baking for the perfect texture, this recipe proves you don’t need to be a pastry chef to bake something incredible. These Cake Mix Red Velvet Cheesecake Brownies combine convenience and wow-factor in a way few desserts can.
Whether you’re prepping for a party, holiday, or just indulging in a cozy night in, these brownies are bound to become a new favorite.
our latest indulgent dessert ideas here: Fudgy Red Velvet Brownies
