

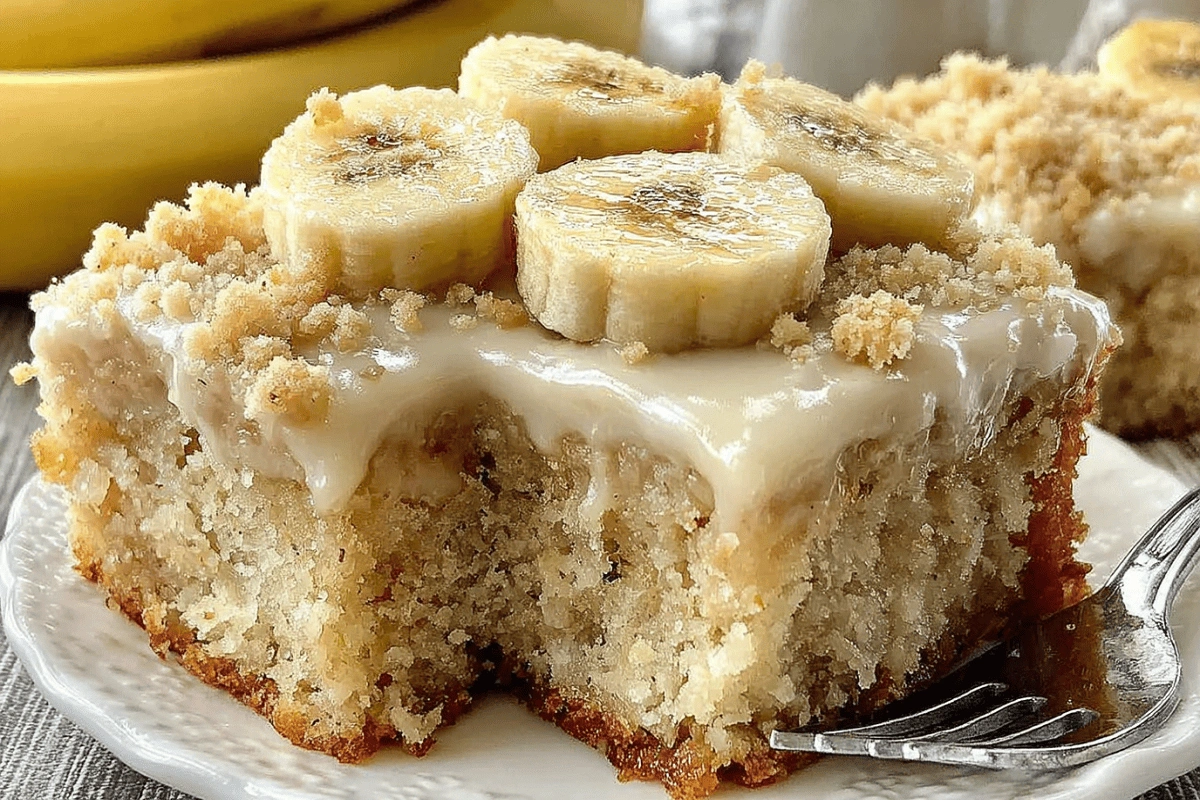
Best Banana Bread Bars with Brown Butter Frosting
If you’re looking for the most satisfying banana dessert that’s not banana bread, look no further than banana bread bars. These soft, moist bars capture everything you love about classic banana bread but deliver it in a sliceable, crowd-pleasing format with an irresistible layer of rich brown butter frosting on top. Whether you’re prepping a weekend bake or need something impressive for a potluck, banana bread bars are the treat you didn’t know you needed.
PART 1: What Makes Banana Bread Bars So Special?
The Evolution from Banana Bread to Bars
Banana bread bars are a delightful twist on traditional banana bread. Instead of baking a thick loaf, you spread the batter into a shallow pan, bake it until golden, and cut it into handheld squares. This changes the texture slightly, making it lighter and fluffier while still capturing the signature banana richness. Plus, they’re perfect for topping—especially with brown butter frosting, which adds a nutty, caramelized depth that’s completely crave-worthy.
These bars were born from the need to take banana bread to events where slices just don’t hold up well. Think school bake sales, brunch buffets, and potluck dinners. Their portability makes them a standout choice.
Why Banana Bread Bars Are Perfect for Sharing
When you bake banana bread bars, you’re essentially making the dessert version of sheet cake with all the heartwarming flavor of banana bread and the convenience of finger food. No cutting into thick loaves. No crumbs falling everywhere. Just grab-and-go goodness with a gorgeous frosting layer that makes them party-ready.
If you’re serving a crowd or prepping treats for gifting, banana bread bars are quicker to bake, easier to decorate, and simpler to portion than traditional banana loaves. Bonus: the rectangular jelly roll pan allows for evenly baked bars every time.
PART 2: Key Ingredients for the Perfect Banana Bread Bars
Bananas: The Backbone of Banana Bread Bars
The main star of banana bread bars is, without question, the banana. Overripe bananas work best—those with deep brown spots and a soft texture. Why? They’re naturally sweeter and blend more smoothly into the batter, ensuring that every bite bursts with bold banana flavor.
Mash the bananas thoroughly to a pudding-like consistency, which helps with moisture and distribution in your bars. Use around 1½ cups (typically 3 ripe bananas) to hit the flavor mark just right.
Why Lemon Juice Enhances Banana Flavor
It might surprise you, but adding just a teaspoon of lemon juice to mashed bananas can significantly elevate their taste. Lemon juice not only balances sweetness with acidity but also prevents the bananas from turning brown too quickly in the batter.
Flour, Baking Soda, and Salt: The Structure Builders
All-purpose flour gives banana bread bars their soft yet sturdy base. Baking soda helps them rise without becoming cake-like, while a pinch of salt rounds out the sweetness and enhances flavor. These dry ingredients are best whisked together separately to avoid uneven baking.
The Role of Butter and Sour Cream in Texture
For truly moist banana bread bars, a combination of unsalted butter and sour cream is key. Butter brings richness and that unmistakable bakery-style taste, while sour cream adds tang and keeps the crumb ultra-tender.
Pro Tip: Soften your butter ahead of time to ensure smooth creaming with sugar—this step is essential for proper texture.
Sugar, Eggs, and Vanilla: For Sweetness and Stability
Granulated sugar sweetens the bars, while eggs help bind the mixture and create structure. Vanilla extract enhances all the background flavors, making the banana notes even more noticeable.
You’ll notice there’s no milk in this recipe. That’s because the bananas and sour cream already add ample moisture.
Optional Add-ins to Personalize Your Bars
Want to level up your banana bread bars? Fold in mini chocolate chips, chopped walnuts, or even a cinnamon swirl for a unique spin. Just don’t overload the batter—¼ to ½ cup of add-ins is more than enough.
💡 Want a shortcut? You can even try using a boxed banana bread mix and enhance it with the same ingredients listed here.
Explore Pillsbury’s creative banana baking ideas for fun recipe twists and quick baking tips.
PART 3: How to Make Banana Bread Bars – Step-by-Step Guide
Step 1: Prepare Your Baking Pan and Preheat the Oven
Before mixing anything, preheat your oven to 375°F (190°C). This higher-than-usual temperature helps the banana bread bars develop a light golden edge while staying moist inside.
Grease a 10×15-inch jelly roll pan generously or line it with parchment paper. This size ensures the batter spreads evenly and bakes into firm yet fluffy bars that cut cleanly once cooled.
Step 2: Mash Bananas and Add Lemon Juice
In a small bowl, mash 1½ cups of ripe bananas until smooth. Stir in 1 teaspoon of lemon juice—this keeps the color vibrant and enhances the banana flavor.
Pro Tip: If your bananas aren’t ripe enough, microwave them (with skin on) for 30–45 seconds to soften and release sweetness.
Step 3: Mix the Dry Ingredients
In a medium bowl, whisk together:
-
2 cups all-purpose flour
-
1 teaspoon baking soda
-
¼ teaspoon salt
This mixture helps create structure without making the bars dense. Always sift or whisk well to avoid lumps.
Step 4: Cream the Butter and Sugar
In a large mixing bowl, beat ½ cup softened unsalted butter with 1½ cups granulated sugar until light and fluffy. This step aerates the batter for a better rise and melt-in-your-mouth texture.
Once creamed, mix in:
-
2 large eggs
-
1 teaspoon vanilla extract
Beat until smooth and fully combined.
Step 5: Combine Wet and Dry Ingredients
Now, gently fold in the mashed banana mixture. Alternate adding your dry flour mixture with ¾ cup of sour cream, beginning and ending with the dry. This method ensures an even blend and keeps the batter light.
The final batter should be thick but easy to spread.
Step 6: Bake the Bars
Pour the batter into your prepared jelly roll pan and spread it into an even layer. Bake for 20–25 minutes, or until the top is lightly golden and a toothpick inserted in the center comes out clean.
Avoid overbaking—these bars should remain soft and slightly springy in the center.
Step 7: Let the Bars Cool Before Frosting
Once baked, allow the banana bread bars to cool completely in the pan on a wire rack. This step is crucial, especially if you plan to frost them—warm bars will melt your frosting and ruin the texture.
PART 4: Secrets to Moist and Fluffy Banana Bread Bars
Sour Cream Is the Game Changer
One of the biggest secrets behind the soft, melt-in-your-mouth texture of banana bread bars is sour cream. Adding ¾ cup of full-fat sour cream introduces moisture and fat, which prevents the bars from drying out in the oven. Sour cream also brings a subtle tanginess that balances the sweetness of the bananas and sugar.
If you don’t have sour cream, plain full-fat Greek yogurt is a reliable substitute. It performs similarly in terms of texture and flavor.
Don’t Overmix Your Batter
Once you combine the wet and dry ingredients, be careful not to overmix. Stir the batter just until no dry flour remains. Overmixing can activate the gluten in the flour, which leads to dense, chewy bars instead of soft, fluffy ones.
Use a spatula or low mixer speed during this step and scrape down the sides to make sure everything blends evenly.
Bananas Add More Than Just Flavor
Mashed bananas bring intense natural sweetness, but they also contribute to structure and moisture. Because banana bread bars are thinner than a loaf, the banana-to-flour ratio is adjusted to keep them firm enough to slice while still tender.
Make sure your bananas are truly ripe—brown and soft. Riper bananas contain more sugar and moisture, which helps the bars bake up rich and soft.
The Right Pan and Temperature Matter
Using a 10×15-inch jelly roll pan is key. A standard loaf pan won’t give you the flat, bar-style shape you need. The shallow depth of the pan also ensures more even baking and prevents soggy middles.
Bake at 375°F, a bit higher than traditional banana bread. This creates a better surface crust and helps the edges caramelize slightly while the inside stays moist.
Want a similar treat with a totally different flavor? Discover our Lemon Oatmeal Crumble Bars for a zesty spin on bar-style baking.
Final Moisture Tip: Let the Bars Cool Completely
Once out of the oven, allow your banana bread bars to cool completely before slicing or frosting. Cutting into them too early releases steam, which can make them soggy over time. Plus, it gives the texture time to set for neater slices.
PART 5: Making the Brown Butter Frosting Irresistible
What Is Brown Butter and Why Use It in Frosting?
Brown butter is simply regular butter that’s been gently cooked until the milk solids turn golden and nutty. It’s a one-ingredient flavor upgrade that adds depth, richness, and a caramel-like aroma to frostings and baked goods. When used on banana bread bars, brown butter transforms the whole dessert, balancing the sweetness of the banana with warm, toasty notes.
This frosting is one of the defining features of this recipe. While banana bars alone are great, topping them with brown butter frosting turns them into something bakery-worthy.
How to Make Brown Butter Without Burning It
To brown butter properly:
-
Place ½ cup unsalted butter in a light-colored saucepan over medium heat.
-
Let it melt, then bubble, whisking occasionally.
-
In 3–5 minutes, you’ll notice brown bits forming at the bottom and a nutty aroma filling the air.
-
As soon as it’s golden brown, remove it from heat—don’t walk away!
Pro Tip: Transfer browned butter to a heatproof bowl right away to stop it from cooking further. Burnt butter will taste bitter.
Let the butter cool for a few minutes before using it in frosting.
Creating a Smooth and Spreadable Frosting
Once the butter has cooled slightly but is still liquid, beat in the rest of your frosting ingredients:
-
4 cups powdered sugar
-
3 tablespoons milk
-
1½ teaspoons vanilla extract
Mix until smooth and spreadable. If the frosting feels too thick, add milk 1 teaspoon at a time until the desired consistency is reached.
You want a silky, thick texture that’s easy to spread but firm enough to hold shape once cooled.
Frosting the Banana Bread Bars
Make sure your banana bread bars are fully cooled before spreading the frosting. If they’re warm, the frosting will melt and slide off.
Use an offset spatula or butter knife to apply a generous layer of frosting. You can keep it rustic or smooth it out for a more finished look. The frosting will firm up slightly as it sits, making these bars ideal for slicing and serving at room temperature.
Want to see another frosting-forward dessert? Check out our Southern Chocolate Cobbler—it’s a hot fudge dream in a dish..
PART 6: Customizing Banana Bread Bars for Any Diet
Banana bread bars are versatile by nature. Whether you’re avoiding gluten, cutting back on dairy, or following a plant-based diet, there are smart ways to modify this classic recipe without sacrificing flavor or texture. Here’s how to make banana bread bars work for everyone at the table.
How to Make Gluten-Free Banana Bread Bars
To make banana bread bars gluten-free, all you need is a proper 1:1 gluten-free flour blend. These are typically labeled as “all-purpose gluten-free flour” and contain a mix of rice flour, potato starch, and xanthan gum to mimic the texture of wheat flour.
Tips for the best results:
-
Use a certified gluten-free flour blend like King Arthur Measure for Measure or Bob’s Red Mill 1-to-1.
-
Check that your baking soda, vanilla extract, and other ingredients are also certified gluten-free to avoid cross-contamination.
-
Let the batter rest for 15–20 minutes before baking. This gives the gluten-free flour time to absorb moisture and helps reduce graininess.
Discover great ideas like our Blue Velvet Brownies, which are easy to adapt to gluten-free baking too.
How to Make Vegan Banana Bread Bars
To go fully plant-based, you’ll need to make a few substitutions. The good news? Banana already acts as a natural binder, making vegan banana bars even easier.
Here’s how to do it:
-
Eggs: Replace each egg with a flax egg (1 tablespoon ground flaxseed + 2½ tablespoons water, rested for 5 minutes).
-
Butter: Use vegan butter or melted coconut oil in equal amounts.
-
Sour Cream: Swap with plain, unsweetened vegan yogurt or dairy-free sour cream.
-
Frosting: Use plant-based butter and dairy-free milk in the brown butter frosting. Note that you won’t get browned milk solids with vegan butter, but the result will still be rich and creamy.
These swaps maintain the soft crumb and bold banana flavor that defines great banana bread bars, all while keeping the recipe accessible to more diets.
Lower-Sugar or Dairy-Free Options
For a lower-sugar version, reduce the granulated sugar by ¼ cup or use coconut sugar. You can also use a low-sugar or sugar-free powdered sugar blend for the frosting, but be mindful of how that affects sweetness and texture.
For dairy-free options, use almond milk or oat milk in place of dairy milk in the frosting and a neutral oil or dairy-free butter alternative in the batter.
Don’t miss our Coconut Lime Chia Pudding Bars for another naturally dairy-free dessert option.
PART 7: Storage, Shelf Life & Freezing Tips
How Long Do Banana Bread Bars Stay Fresh?
Banana bread bars are incredibly moist, which makes them delicious—but also means they need proper storage to avoid spoilage. When stored in an airtight container at room temperature, the bars will stay soft and fresh for up to 3 days. If you live in a warmer climate or have already frosted them, refrigerate instead to extend shelf life to 5–6 days.
Refrigerating and Reheating Tips
While banana bread bars do just fine in the fridge, the frosting will firm up. To serve them at peak texture, take them out of the fridge and let them sit at room temp for 10–15 minutes before enjoying. This softens both the bar and the brown butter frosting, restoring their bakery-like consistency.
Freezing Banana Bread Bars
Yes, banana bread bars freeze beautifully—especially if you freeze them unfrosted. Here’s how:
-
Cool bars completely.
-
Slice and wrap each bar in plastic wrap.
-
Place wrapped bars in a freezer-safe bag or container.
-
Label and date; freeze for up to 3 months.
To thaw, simply let bars sit at room temperature for a few hours or overnight in the fridge. Add the frosting after thawing for best presentation.
PART 8: Serving Ideas & Occasion Pairings
Perfect for Potlucks, Picnics, and Bake Sales
Banana bread bars are super portable, easy to slice, and universally loved—which makes them a go-to for bake sales, potlucks, birthday brunches, and family gatherings. Unlike traditional banana bread, these don’t require a knife or plate to enjoy.
If you’re prepping for a party, consider cutting the bars into smaller bites and serving them as banana dessert squares on a tray. Their soft texture and rich frosting make them feel fancy, even without extra decoration.
Don’t miss our Strawberry Cheesecake Dump Cake for another dreamy, crowd-sized dessert option.
Toppings and Add-Ins to Elevate Flavor
While brown butter frosting is the classic, you can also try:
-
A cream cheese glaze with lemon zest
-
Chopped toasted walnuts or pecans sprinkled on top
-
Chocolate chips folded into the batter
-
A drizzle of melted peanut butter over cooled frosting
These upgrades let you turn the same base banana bar recipe into dozens of variations—great if you like experimenting with flavor combos.
PART 9: Common Questions About Banana Bread Bars (FAQs)
What is the difference between banana bread and banana bread bars?
Banana bread is typically baked in a loaf pan and has a dense, cakey structure. Banana bread bars are thinner, lighter, and baked in a jelly roll or sheet pan, making them easier to frost, slice, and serve for parties or events.
How do you make banana bread bars moist?
The key to moisture is using ripe bananas, sour cream, and softened butter. Avoid overbaking and be sure to measure flour correctly to prevent dry, crumbly bars.
Can banana bread bars be made gluten-free or vegan?
Yes! Use a gluten-free flour blend and swap in flax eggs, plant-based butter, and vegan sour cream to make the bars both gluten-free and vegan. They’ll still be soft and flavorful with the right substitutions.
How long do banana bread bars stay fresh?
At room temperature, they stay fresh for 2–3 days in an airtight container. In the fridge, they last 5–6 days. You can also freeze them (unfrosted) for up to 3 months and frost after thawing.
Conclusion: Banana Bread Bars Are the Ultimate Anytime Treat
Whether you’re baking for a special gathering or just looking to use up a few overripe bananas, these banana bread bars with brown butter frosting are the answer. They’re moist, sweet, and perfectly portioned, offering all the cozy comfort of banana bread in a portable, frosted square.
What makes them truly shine is their adaptability—from gluten-free or vegan versions to topping ideas that let you customize every batch. With a quick prep and effortless storage, you’ll find yourself making them again and again.
Don’t miss our Banana Pudding Milkshakes for another banana-packed dessert twist!
Try baking a batch this weekend and watch them disappear within minutes. Once you do, you’ll never look at a banana the same way again.
