

Mini Funfetti Cheesecakes – The Best Colorful Bite-Sized Dessert for Every Occasion
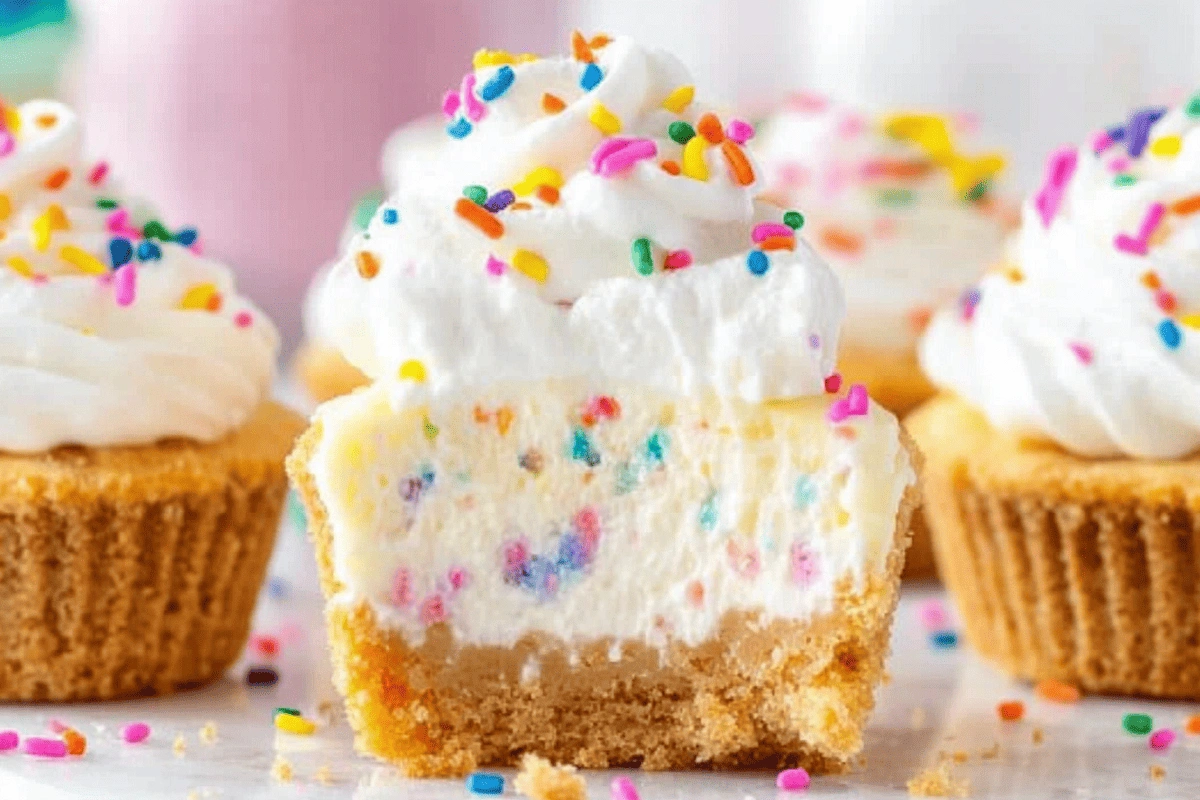
Mini Funfetti Cheesecakes are the ultimate combination of creamy indulgence and playful celebration. These mini funfetti cheesecakes are packed with rainbow sprinkles, rich cheesecake flavor, and a buttery Nilla Wafer crust all baked into cupcake liners for the perfect single-serve dessert. Whether you’re planning a birthday party, holiday gathering, or just craving something colorful and fun, mini funfetti cheesecakes are guaranteed to delight both kids and adults.
In this guide, we’ll show you how to make them from scratch, including the exact ingredients, step-by-step baking instructions, and tips for decorating like a pro. You’ll learn how to avoid common mistakes (like cracked tops and bleeding sprinkles), how to store them for later, and even how to make a no-bake version. We’ll also walk you through fun variations, from chocolate crusts to gluten-free swaps, so you can make these mini cheesecakes your own.
Looking for inspiration? Try our Heavenly Summer Peach Bars – The Best Fruity Dessert for Summer Lovers for another bite-sized hit your guests will love.
Let’s kick things off by understanding what makes these mini treats so irresistible.
What Are Mini Funfetti Cheesecakes?
What Makes a Cheesecake “Funfetti”?
Funfetti cheesecakes get their name from the rainbow sprinkles baked right into the batter, giving the dessert a confetti-like appearance. The sprinkles not only add vibrant color but also a subtle sweetness and soft texture. When folded gently into a creamy, rich cheesecake base, they create colorful bursts throughout every bite. The look is festive, the flavor is classic, and the result is a treat that’s as cheerful as it is delicious.
Why Mini Cheesecakes Are Perfect for Parties and Celebrations
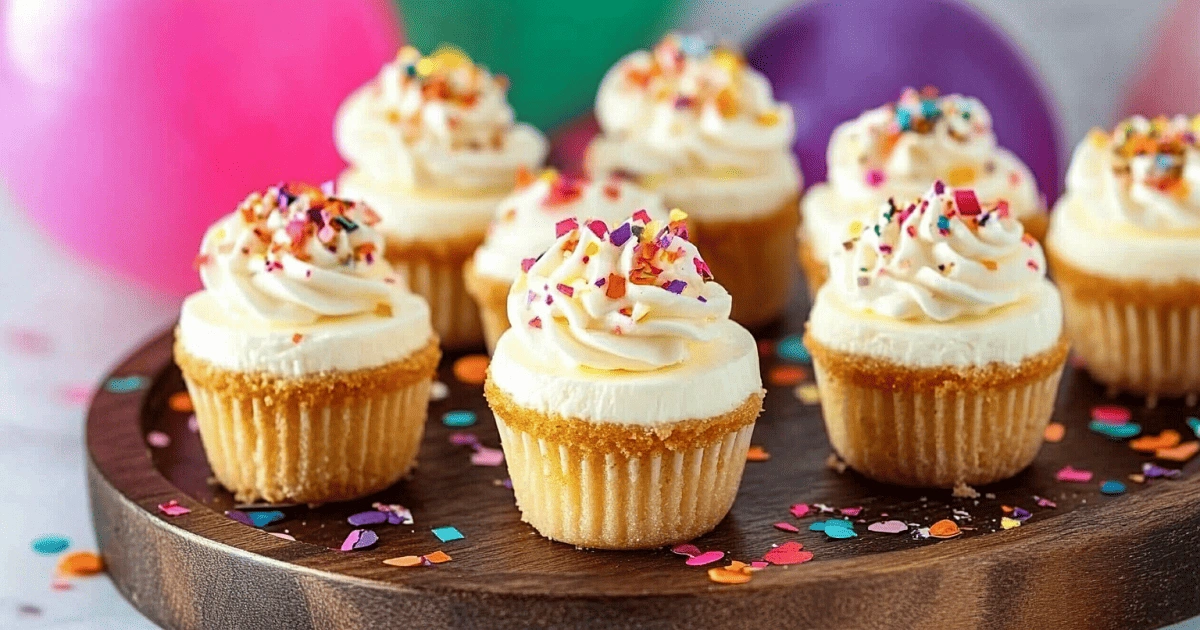
Mini cheesecakes are a smart dessert choice for any gathering. Their individual size makes serving effortless no cutting, no mess. Guests love grabbing a perfectly portioned cheesecake that’s easy to eat and full of flavor. And thanks to their cupcake-like size, they’re fun to decorate and even more fun to display. Whether it’s a birthday, shower, or BBQ, mini funfetti cheesecakes add instant joy to any celebration.
Print
Mini Funfetti Cheesecakes – The Best 9-Step Colorful Dessert for Parties
- Total Time: 38 minutes (default to Prep + Cook, per schema standards)
- Yield: 15–16 mini cheesecakes
- Diet: Vegetarian
Description
Creamy, colorful, and party-perfect these little cheesecakes are loaded with rainbow sprinkles and topped with fluffy whipped cream! Made in a cupcake pan with a buttery Nilla wafer crust, they’re the ultimate bite-sized birthday dessert. Quick to bake, easy to chill, and guaranteed to wow guests of all ages.
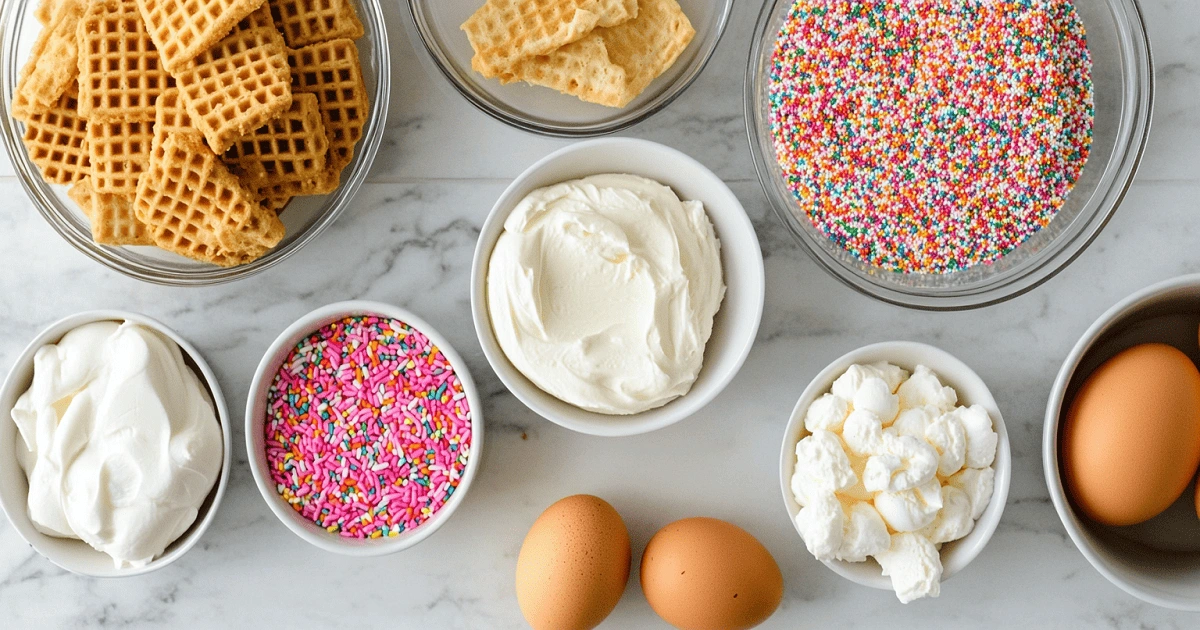
Ingredients
For the Crust:
• 1¼ cups (112g) Nilla Wafer crumbs (about 1 heaping cup of cookies)
• 3 tbsp (43g) unsalted butter, melted
For the Cheesecake Batter:
• 16 oz (452g) full-fat cream cheese, room temp
• ⅓ cup (63g) granulated sugar
• ½ cup (120g) sour cream, room temp
• 1 tbsp (15ml) pure vanilla extract
• 2 large eggs, room temp
• ⅓ cup rainbow sprinkles
Optional Topping:
• 1 cup (236ml) heavy whipping cream
• ½ cup (65g) powdered sugar
• Extra sprinkles for garnish
Instructions
1️⃣ Prepare the Crust:
• Preheat oven to 350°F. Line cupcake pan with 15–16 liners.
• Crush Nilla Wafers in a food processor into fine crumbs.
• Mix with melted butter until combined.
• Add 1 heaping tablespoon of crust to each liner and press firmly. Set aside.
2️⃣ Make the Cheesecake Batter:
• In a large bowl, beat cream cheese and sugar until smooth.
• Add sour cream and vanilla; beat again.
• Add eggs one at a time, mixing just until combined.
• Gently fold in the sprinkles.
3️⃣ Bake & Chill:
• Scoop batter into each cupcake liner, filling nearly to the top.
• Add extra sprinkles on top if desired.
• Bake at 350°F for 15–18 minutes. Centers should jiggle slightly.
• Cool in pan, then refrigerate for at least 2 hours before serving.
4️⃣ Optional Whipped Cream Topping:
• Chill mixing bowl and beaters for 5–10 minutes.
• Beat heavy cream until soft peaks form.
• Add powdered sugar and continue beating until stiff peaks form.
• Pipe or spoon onto chilled cheesecakes. Garnish with sprinkles.
Notes
-
Room Temperature Ingredients Are Key
Always use room temperature cream cheese, sour cream, and eggs. This ensures a smooth batter and prevents lumps in your cheesecake filling. -
Best Sprinkles to Use
Use rainbow jimmies (the soft, rod-shaped sprinkles) to prevent color bleeding. Avoid nonpareils or sanding sugar, which may dissolve or discolor your batter. -
Make Ahead Friendly
These mini cheesecakes are perfect for making ahead. You can refrigerate them for up to 5 days or freeze them (without whipped topping) for up to 2 months. -
No-Bake Option
For a no-bake version, chill the crust instead of baking, and use a whipped cream–based filling. Perfect for summer entertaining without heating the oven. -
Topping Tip
Add whipped cream and extra sprinkles just before serving to maintain texture and color vibrancy. Stabilized whipped cream holds up better for longer events. -
Crust Swaps
No Nilla Wafers? Try graham crackers, golden Oreos, or shortbread cookies as a base. For a chocolate twist, use crushed chocolate sandwich cookies. -
Gluten-Free & Dairy-Free Options
Use gluten-free cookies for the crust and plant-based cream cheese, sour cream, and whipped topping for a dairy-free version. -
Serving Suggestion
Serve chilled directly from the fridge. These cheesecakes soften at room temperature, so they’re best consumed within 30 minutes of plating.
- Prep Time: 20 minutes (includes crust + filling assembly)
- Cook Time: 18 minutes (baking the cheesecakes)
- Category: Dessert
- Method: Baking (also includes No-Bake variation)
- Cuisine: American
Nutrition
- Serving Size: 1 mini cheesecake (approx. 65g)
- Calories: 215 kcal
- Sugar: 14g
- Sodium: 140mg
- Fat: 14g
- Saturated Fat: 8g
- Unsaturated Fat: 5g
- Trans Fat: 0g
- Carbohydrates: 19g
- Fiber: 0g
- Protein: 3g
- Cholesterol: 55mg
Keywords: Mini Cheesecake Recipes, Birthday Party Ideas, Sprinkle Treats, Cupcake Pan Cheesecakes, No-Fuss Desserts, Colorful Party Foods, Easy Celebration Recipes, Whipped Cream Topped Treats, Cheesecake Lovers, Kid-Friendly Baking
Ingredients Needed for the Best Mini Funfetti Cheesecakes
Choosing the Right Cream Cheese, Sour Cream, and Sprinkles
When it comes to baking the perfect mini funfetti cheesecakes, quality ingredients make all the difference. Start with full-fat cream cheese avoid low-fat or whipped versions, as they won’t give you the same rich, smooth texture. Let it come to room temperature before mixing to ensure a lump-free batter.
Next up is sour cream. It adds creaminess while gently cutting the sweetness with a hint of tang. Just like cream cheese, make sure it’s full-fat and at room temperature. The combination of cream cheese and sour cream gives the filling that signature soft, melt-in-your-mouth texture.
And of course, no funfetti dessert is complete without rainbow sprinkles. But not all sprinkles are created equal. For best results, use jimmies the long, soft type. Avoid nonpareils or sanding sugar, which are more likely to bleed during baking. Gently fold in the sprinkles to preserve their color and shape.
Why Nilla Wafers Make the Best Crust Base
One of the most crowd-pleasing parts of these mini cheesecakes is the crust. Instead of using traditional graham crackers, we opt for Nilla Wafer crumbs. These vanilla-flavored cookies have a slightly sweet, buttery flavor that complements the cheesecake beautifully.
Pulse wafers into fine crumbs, then mix with melted butter until it feels like wet sand. This mixture presses perfectly into the bottom of cupcake liners, forming a solid yet tender base once baked. You only need about a heaping tablespoon per liner.
Don’t miss our Butterscotch Cake with Caramel Frosting – The 3-Step Best Recipe (2025) if you’re looking to explore other delicious crust options.
Using quality ingredients like these ensures that your mini cheesecakes will come out tasting bakery-fresh every time.

Step-by-Step Baking Instructions
How to Make the Nilla Wafer Crust Perfectly
Preheat to 350°F and line a muffin pan with 15–16 cupcake liners. Once your Nilla Wafer and butter mixture is ready, spoon about 1 heaping tablespoon into each liner. Press crumbs flat with a spoon or glass to form crusts. Bake for 5 minutes, then let cool slightly.
Mixing and Baking the Creamy Cheesecake Filling
Beat softened cream cheese with sugar in a large bowl until completely smooth and lump-free. Add the sour cream and vanilla extract, mixing again until the batter is glossy and creamy. Beat in the eggs one at a time, just until combined. Too much mixing adds air, which can cause cracks as they bake.
Next, gently fold in the rainbow sprinkles, being careful not to over-stir or you’ll risk color bleeding. Use a medium scoop or spoon to divide the batter evenly among the liners, filling each nearly to the top.
Add a few more sprinkles on top if you want extra color. Bake at 350°F for 15–18 minutes. The centers should jiggle slightly when you gently shake the pan this means they’re just set. Don’t worry if they puff up; they’ll settle as they cool.
Once baked, let the Mini Funfetti Cheesecakes cool in the pan for 15–20 minutes, then transfer to the refrigerator to chill for at least 2 hours. Chilling helps the texture firm up and develop that dense, creamy bite we all love.
Check out our 4th of July Cookie Cake – The Best Patriotic Dessert You’ll Love (2025) for more festive dessert inspiration that’s perfect for celebrations.
With these steps down, you’re already halfway to funfetti perfection. Now let’s make sure they come out flawless every time…
Tips for Perfect Mini Funfetti Cheesecakes Every Time
How to Prevent Cracks and Sinking
One of the most common issues bakers face with Mini Funfetti Cheesecakes is cracking or sinking in the center. While it doesn’t ruin the taste, it can affect presentation especially for events. The good news? It’s avoidable. Check out this helpful guide on why your cheesecake might crack and how to fix it from Taste of Home for expert-level insights.
First, make sure all your cold ingredients especially cream cheese, sour cream, and eggs are at room temperature before mixing. This ensures a smooth batter and reduces the need for overmixing, which can trap air and lead to cracks. Speaking of overmixing, once you add the eggs, beat just until combined. Air bubbles are not your friend when it comes to cheesecake.
Another crucial step is not overbaking. The center should still jiggle slightly when you take the cheesecakes out of the oven. Overbaking causes the filling to tighten and crack as it cools. After baking, let them cool slowly at room temperature before refrigerating. Rapid cooling can also lead to sinking.
Smart Techniques for Even Baking and Cooling
Use an oven thermometer to make sure your temperature is accurate many ovens run hotter or cooler than the dial says. Also, baking your mini funfetti cheesecakes in the middle rack ensures even heat distribution.
Allowing the cheesecakes to sit in the turned-off oven with the door cracked for 10 minutes after baking helps prevent sudden temperature shifts. Once cooled, chill them for at least 2 hours in the fridge, or overnight for best results.
Don’t miss our Strawberry Lemonade Poke Cake – Cool 4th of July Dessert Idea!! if you’re looking for another vibrant and refreshing dessert.
By following these baking and cooling strategies, your mini cheesecakes will be smooth, creamy, and party-perfect every single time.
Decoration and Serving Ideas
How to Use Whipped Cream and Sprinkles Without Melting
When decorating Mini Funfetti Cheesecakes, timing is everything especially with toppings like whipped cream. Only add whipped cream after the cheesecakes have fully chilled. For best results, use stabilized whipped cream by mixing heavy cream with powdered sugar until stiff peaks form. This helps it hold its shape even after a few hours out of the fridge.
If you’re piping the whipped cream, use a star tip for that classic bakery look. Add extra rainbow sprinkles on top right before serving so they stay crisp and colorful. If added too early, sprinkles can bleed or melt into the cream, especially in warm environments.
Creative Birthday and Holiday Presentation Tips
Mini Funfetti Cheesecakes are incredibly versatile for decorating to match any celebration. Hosting a birthday party? Use colorful cupcake liners and top each cheesecake with a candle or themed topper. For a Fourth of July party, add red and blue sprinkles or a small American flag toothpick.
You can also serve them on a tiered dessert stand for a stunning display, or place them in clear mini cupcake boxes as party favors. These tiny cheesecakes not only taste amazing they look like little edible gifts.
Need more festive dessert ideas? Check out our 4th of July Rice Krispies Treats – The Best No-Bake Dessert Idea to add variety to your dessert table.
Dress them up right, and mini funfetti cheesecakes steal the show at any celebration.
Mini Funfetti Cheesecake Storage and Make-Ahead Tips
How Long Mini Funfetti Cheesecakes Last in the Fridge or Freezer
Mini Funfetti Cheesecakes are not just adorable they’re also easy to store and perfect for prepping ahead of time. Store in an airtight container and they’ll stay fresh in the fridge for up to 5 days. Be sure to keep them chilled at all times, especially if you’ve added whipped cream toppings.
Need to make them further in advance? Freeze them! Once cooled and set, wrap each mini cheesecake tightly in plastic wrap, then place them in a freezer-safe container or zip-top bag. They’ll keep well for up to 2 months.
How to Thaw and Serve for Best Texture and Flavor
When you’re ready to enjoy your frozen Mini Funfetti Cheesecakes, transfer them to the fridge and let them thaw overnight. This slow defrosting process maintains their creamy texture. Avoid thawing at room temperature, which can cause condensation or make the crust soggy.
If decorating with whipped cream and sprinkles, wait until after they’ve fully thawed to avoid melting or bleeding. These mini treats are incredibly freezer-friendly, making them ideal for party planning and last-minute dessert cravings.
No-Bake Mini Funfetti Cheesecake Option
Ingredients and Method for No-Bake Version
If you’re short on time or want to skip the oven, No-Bake Mini Funfetti Cheesecakes are a fantastic alternative. For the crust, mix crushed Nilla Wafers and melted butter as usual, then press into cupcake liners and chill in the fridge for 15 minutes.
Beat cream cheese, powdered sugar, and vanilla, then gently fold in whipped cream and sprinkles. Spoon into the liners, level the tops, and refrigerate for at least 4 hours, or until firm.
Differences in Texture and Taste Compared to Baked Cheesecakes
No-bake versions are lighter and fluffier than their baked counterparts, with a mousse-like texture. They’re slightly sweeter and less dense, but still packed with classic cheesecake flavor. They’re perfect for summer or when you want to avoid heating the kitchen.
Want more chilled delights? Don’t miss our Heavenly Summer Peach Bars – The Best Fruity Dessert for Summer Lovers.

Troubleshooting Common Problems
Why Sprinkles Bleed and How to Stop It
One common issue when making Mini Funfetti Cheesecakes is sprinkles bleeding into the batter, creating murky streaks instead of vibrant pops of color. This usually happens when using the wrong type of sprinkles or overmixing the batter. To avoid this, always use jimmies the long, soft sprinkles and gently fold them into the batter at the end. Don’t use nonpareils or sanding sugars, which tend to dissolve quickly.
Also, don’t let the batter sit too long after adding the sprinkles. Pour it into the liners and bake right away. And avoid adding sprinkles to warm batter, as the heat accelerates color bleeding.
What to Do if Your Cheesecakes Don’t Set Properly
If your Mini Funfetti Cheesecakes turn out too soft or runny, the most likely cause is underbaking or insufficient chilling time. Always bake until the center slightly jiggles, not wobbles. Then, cool and refrigerate for at least 2 hours. For no-bake versions, chilling is even more crucial give them a full 4 to 6 hours.
Fun Variations to Try with Mini Funfetti Cheesecakes
Red Velvet Funfetti, Chocolate Crusts, and Other Flavor Mix-ins
Spice up your Mini Funfetti Cheesecakes by trying creative flavor variations. Try almond or lemon extract instead of vanilla, or fold in mini chocolate chips for added richness. You can also explore full-size options for a bigger celebration like this beautiful Funfetti Cheesecake from Pies and Tacos for more inspiration.
You can even add red velvet cake crumbs to the batter for a colorful twist. For a fruity touch, top with strawberry or raspberry sauce.
How to Adapt the Recipe for Gluten-Free or Dairy-Free Diets
For a gluten-free version, use gluten-free vanilla wafers or almond flour in the crust. To make them dairy-free, swap cream cheese and sour cream for plant-based alternatives, and use coconut cream for the whipped topping.
These variations let you enjoy funfetti magic with everyone no matter their dietary needs.
FAQ: Mini Funfetti Cheesecakes
What are mini funfetti cheesecakes?
Mini Funfetti Cheesecakes are single-serve cheesecakes baked in cupcake liners and filled with a creamy batter loaded with rainbow sprinkles. They combine classic cheesecake flavor with the colorful flair of funfetti desserts, making them a popular choice for birthdays, holidays, and parties. They’re typically made with a vanilla wafer crust and topped with whipped cream and extra sprinkles.
Can you make mini funfetti cheesecakes without baking?
Yes! No-bake Mini Funfetti Cheesecakes are just as delicious and perfect for warm weather or when you don’t want to turn on the oven. They use the same crust but rely on a whipped cream–based filling that firms up in the fridge rather than the oven. These versions have a lighter, mousse-like texture and can be chilled for 4 to 6 hours before serving.
How long do mini funfetti cheesecakes last?
Kept in the fridge in an airtight container, they stay fresh for up to 5 days. For longer storage, freeze them (without whipped topping) for up to 2 months. Thaw overnight in the fridge before serving and add fresh toppings after thawing.
How do I prevent sprinkles from bleeding in cheesecakes?
To prevent sprinkles from bleeding, use “jimmies,” the soft, oblong style of sprinkles. Fold them in gently right before baking or chilling, and never use nonpareils or sanding sugar, which dissolve quickly. Bake the cheesecakes immediately after folding in the sprinkles, and avoid overmixing the batter.
Conclusion
Whether you’re hosting a birthday bash, prepping for a holiday, or just want a sweet treat to brighten your week, Mini Funfetti Cheesecakes are the perfect solution. With their creamy texture, fun sprinkles, and easy preparation, they’re a guaranteed crowd-pleaser. You can customize them to fit any event, make them ahead of time, and even go no-bake when needed.
Don’t miss our Cake Mix Red Velvet Cheesecake Brownies – The Best Easy Dessert (2025) for another indulgent, easy-to-make treat that’s perfect for dessert lovers.
